
 Security Research
The Forgotten Access
One advisory. Five stages. Countless rabbit holes. 💀 From OSINT to AI steganography, reverse engineering, cryptography, and GitHub forensics. The Forgotten Access — where finding one clue only unlocks another problem. 😭 And some of you thought it was just a simple CTF. 💀
எப்பொருள் எத்தன்மைத் தாயினும் அப்பொருள்
மெய்ப்பொருள் காண்பது அறிவு.— திருவள்ளுவர், திருக்குறள் 355
“True wisdom lies in discovering the truth behind appearances.”
The Forgotten Access
They buried the evidence. They erased the trail. But they forgot one thing — access.
What begins as an ordinary security advisory leads into a maze of forgotten projects, mysterious artifacts, and secrets hidden in plain sight.
Not every discovery is an answer. Not every flag is real. Some trails lead nowhere, while others reveal fragments of something much bigger.
The deeper you investigate, the more you realize that nothing was left behind by accident.
Follow the breadcrumbs. Question everything. Trust nothing.
Some secrets were never meant to be found. Others were simply waiting for the right person.
Challenge URL: https://advisory.w4nn4d13.tech/
Flag format: WiCySxEx0rcists{}
Stage 1 — OSINT
One Hundred Entries. One Worth Following.
The investigation starts at the advisory website. At first glance, it looks like a security advisory archive: categories, severity counts, CVE entries, and links to external references. There are 100 advisories to look through. Plenty of material to distract you if your strategy is “click everything and hope a flag falls out.”
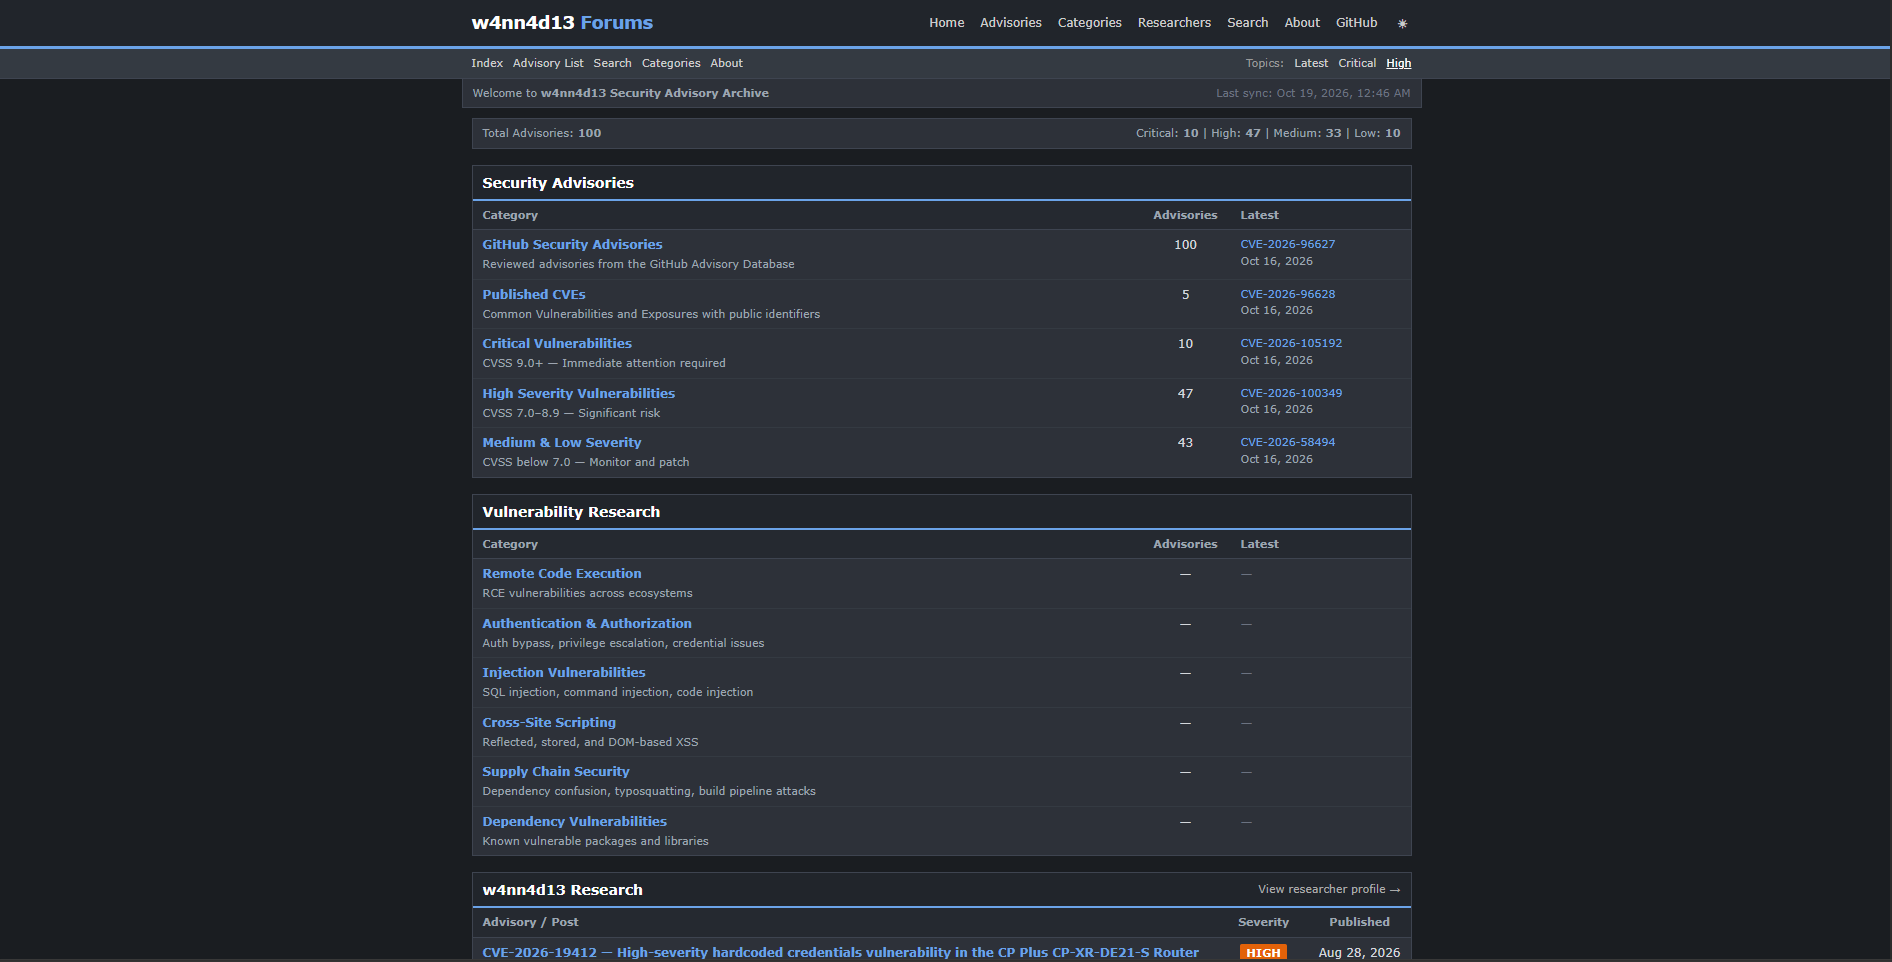
Figure 1 — The starting point: an apparently ordinary archive containing 100 advisories.
I put the opening breadcrumb among those entries. CVE-2026-41575, titled DOM-Based XSS in IP Reputation Checker (th30d4y/IP), deserves a closer look. It has both NVD and GHSA references beside it, while the surrounding entries shown here have NVD links alone.
That difference gives us something specific to investigate. We have a CVE identifier, a repository name, and two reference paths. No scanner required yet. Reading remains a surprisingly effective tool.
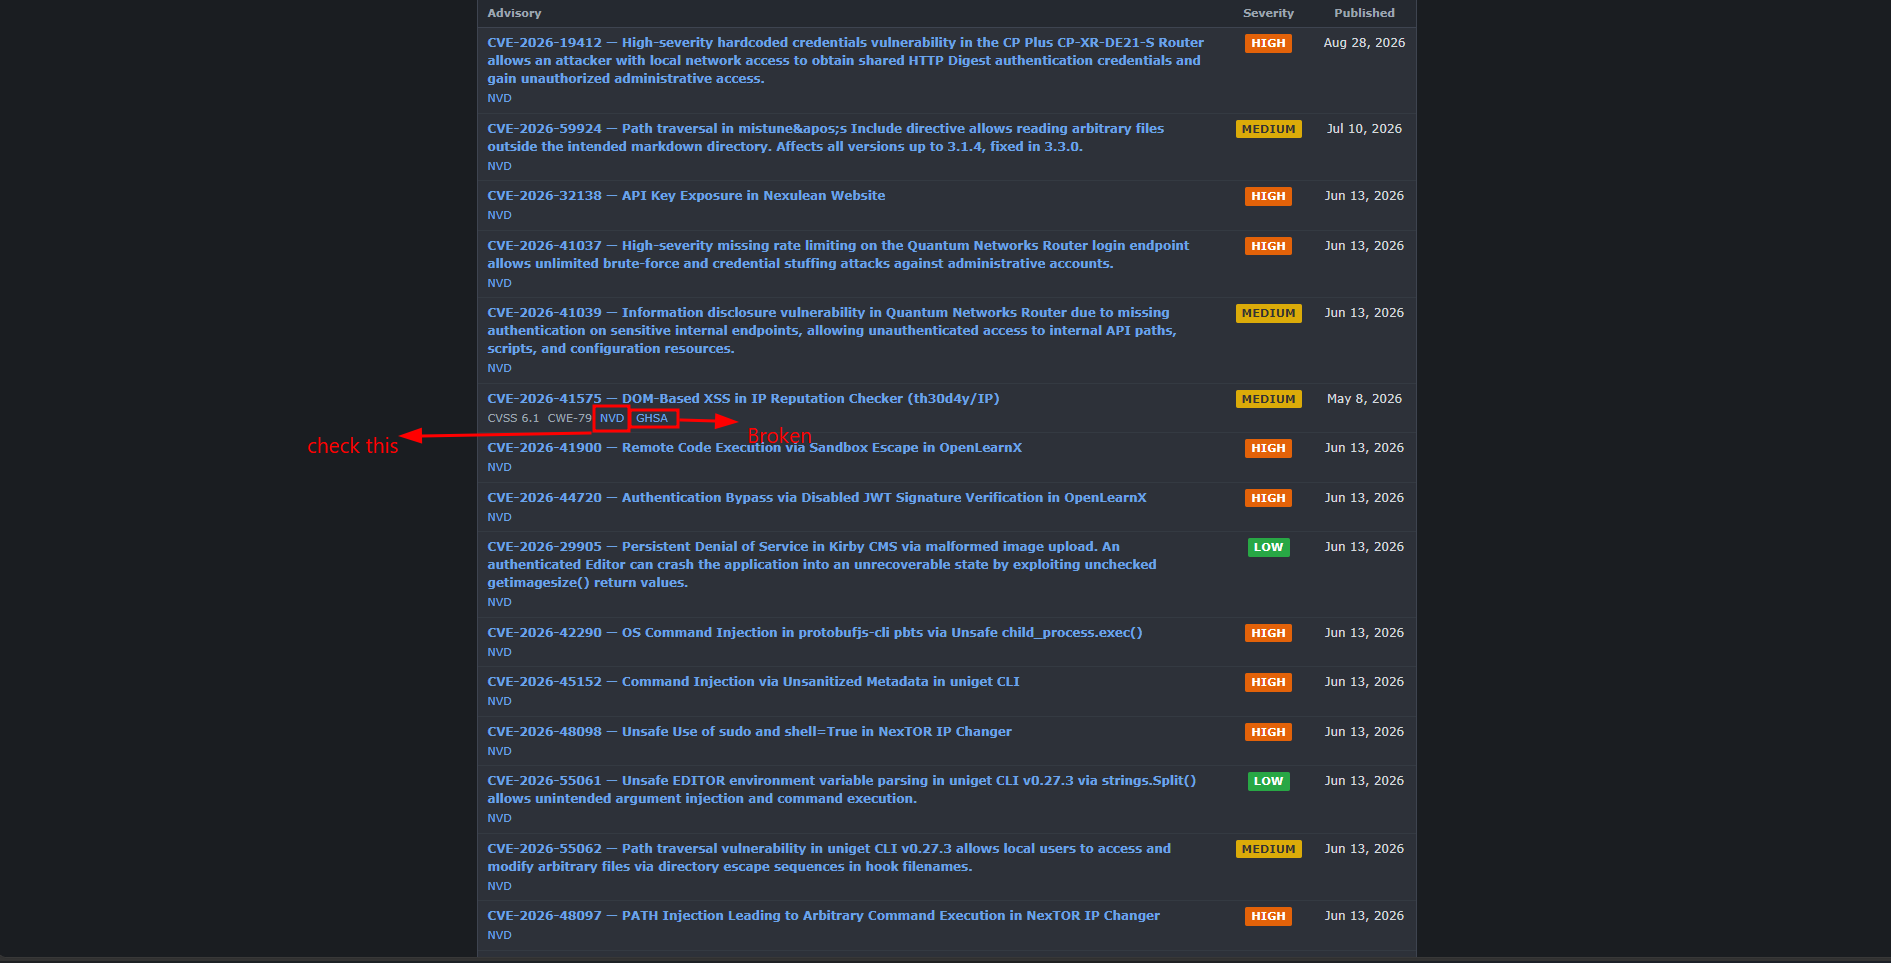
Figure 2 — CVE-2026-41575 stands out with two references: NVD and GHSA. The annotations mark the broken GHSA path and the alternative route through NVD.
The GHSA Link Is Broken. Keep Looking.
Following the GHSA link lands us on GitHub’s 404 page. A dead end? For that URL, yes. For the investigation, we still have an unused reference sitting right beside it.
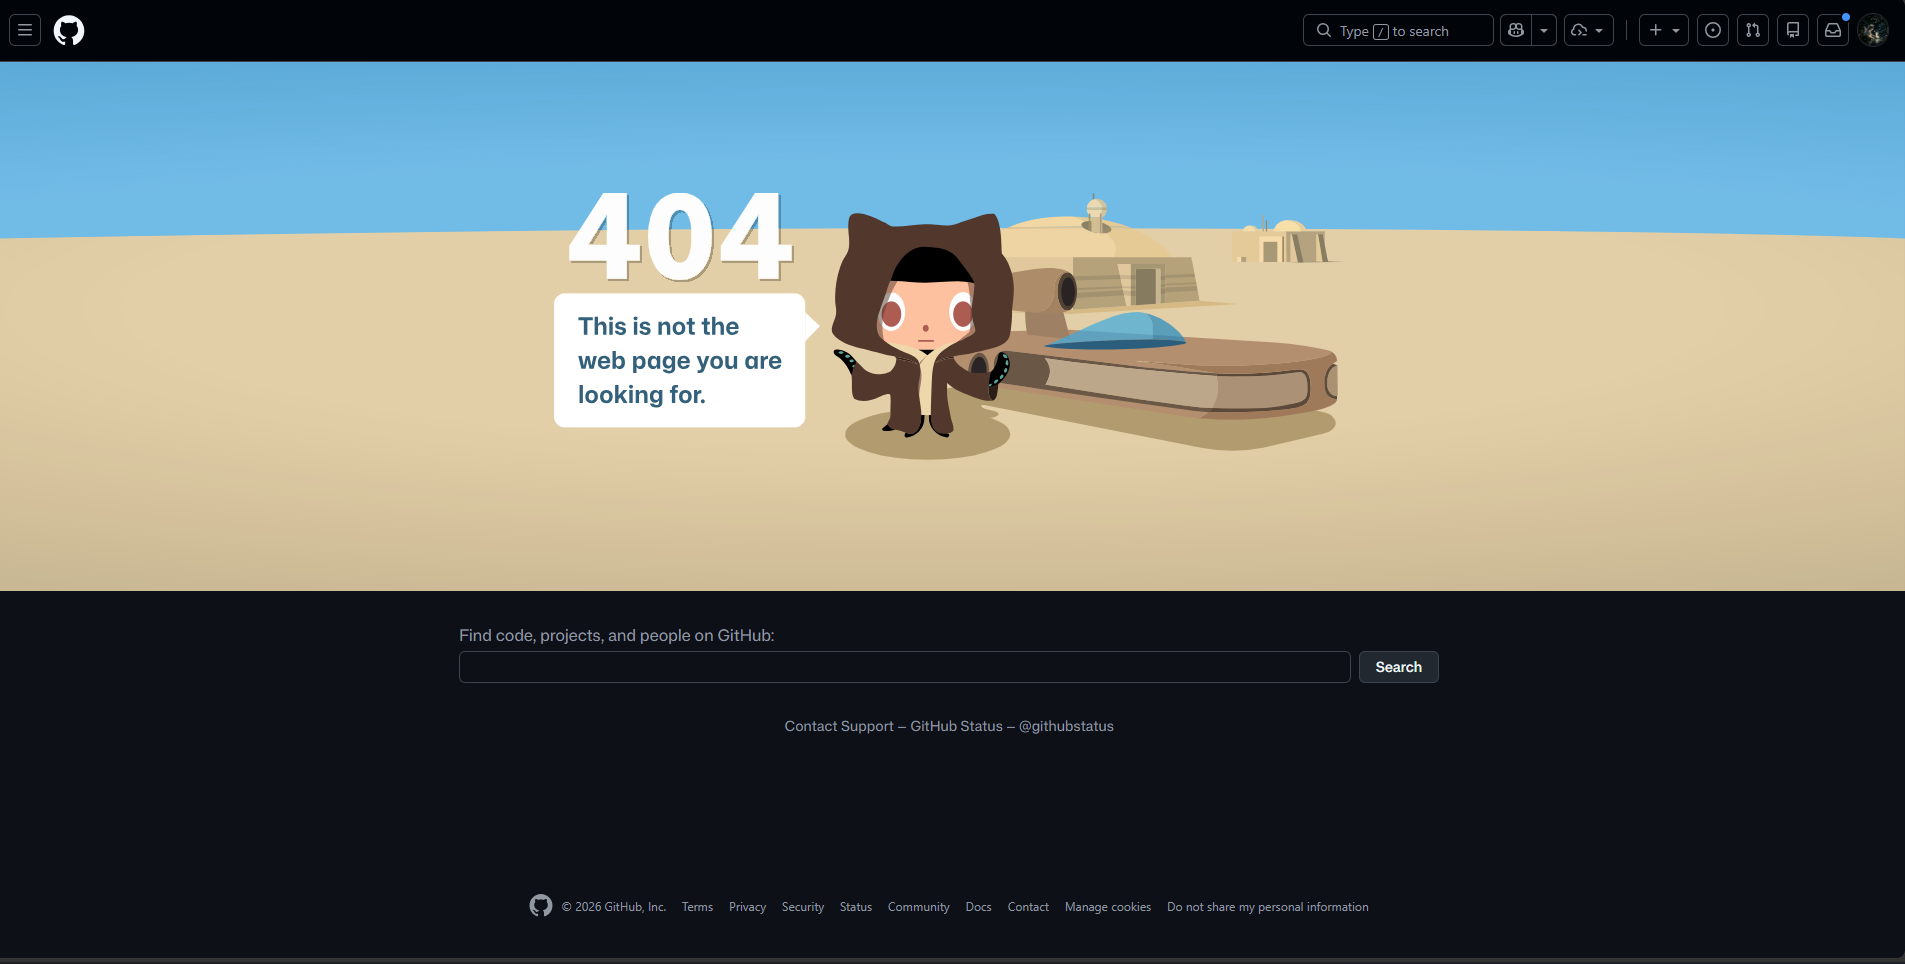
Figure 3 — The original GHSA link returns 404. This establishes that the link failed, not that the advisory cannot be found.
Bro, the link was broken, not your investigation skills. Dig deeper.
Go back to the CVE entry and follow its NVD reference. On the NVD record, scroll to References to Advisories, Solutions, and Tools. That section provides the repository-specific GitHub security advisory URL:
https://github.com/th30d4y/IP/security/advisories/GHSA-j7wv-7j97-9qh9
The useful move here is cross-referencing the same CVE through another source. We already have an identifier to follow; guessing random GitHub URLs would only make this take longer.
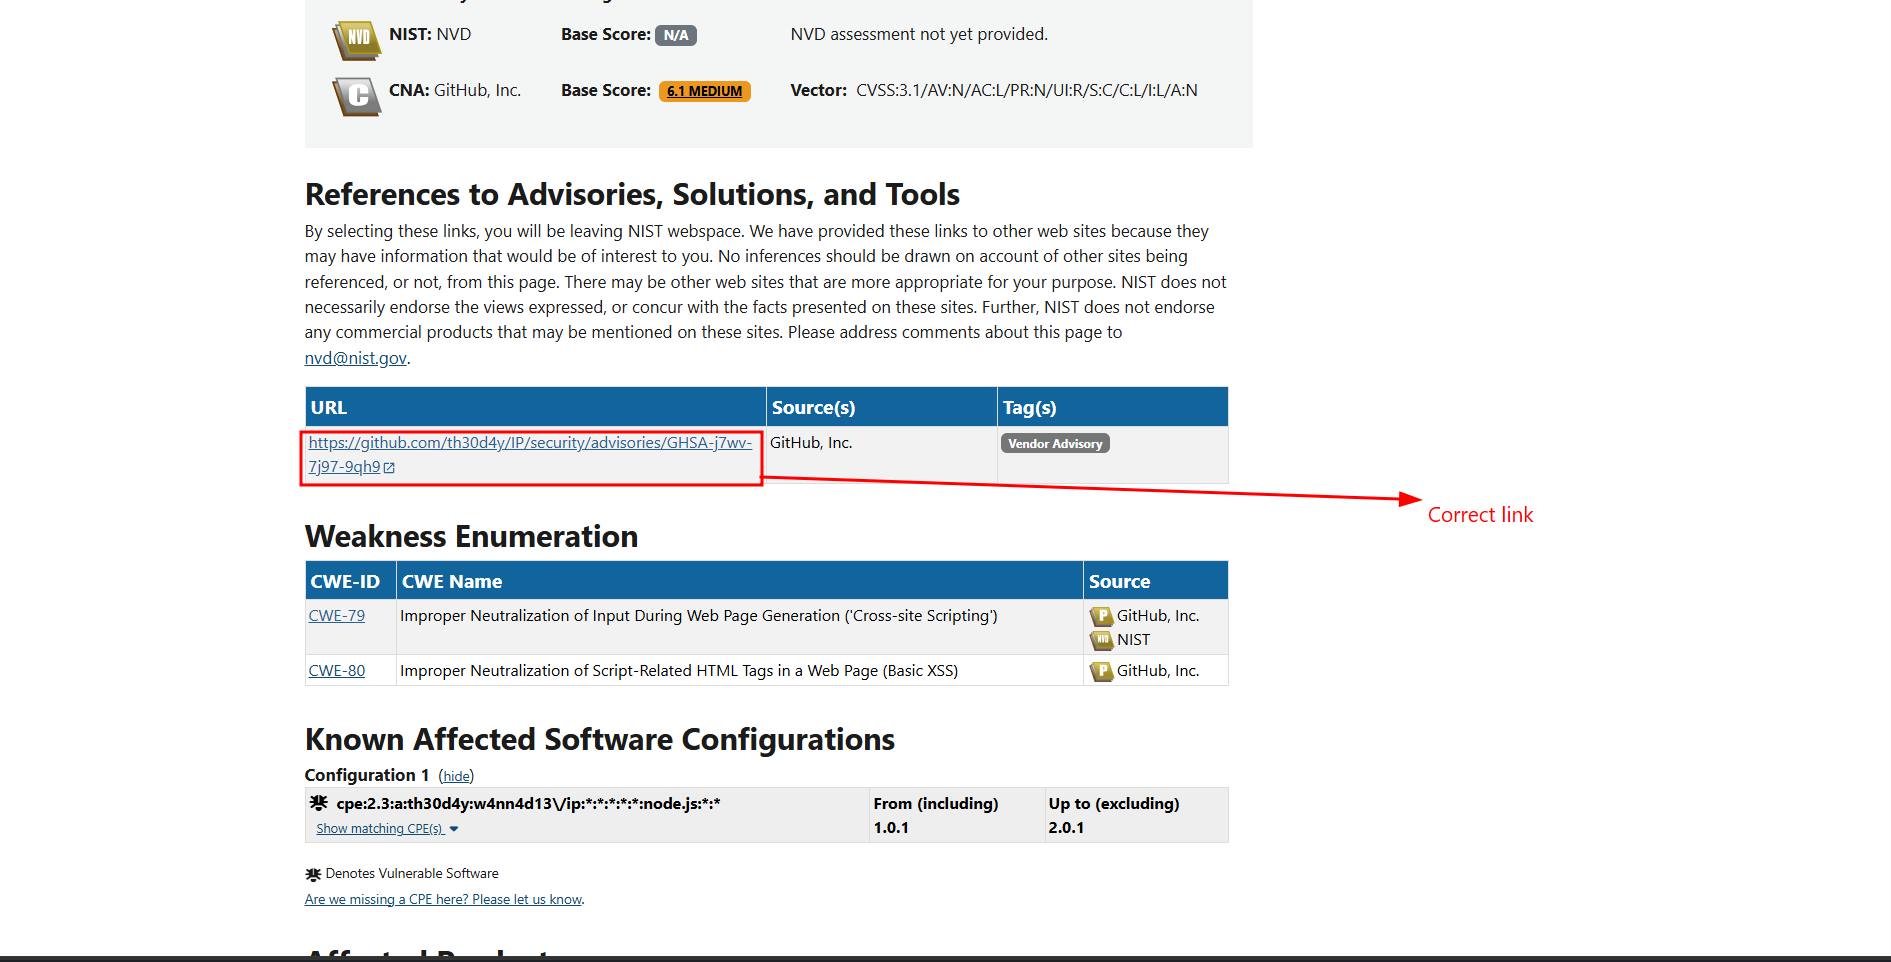
Figure 4 — The NVD references table supplies the correct repository advisory path, ending in GHSA-j7wv-7j97-9qh9.
From the Advisory to the Repository
Following that reference opens the actual GitHub advisory: DOM-Based Cross-Site Scripting (XSS) Vulnerability in IP Reputation Checker. The page shows CVE-2026-41575 and GHSA-j7wv-7j97-9qh9, so we can match it back to the entry that started this detour.
The advisory lives under th30d4y/IP. From here, open the repository through the breadcrumb or its Code tab. We now have a concrete project to inspect.
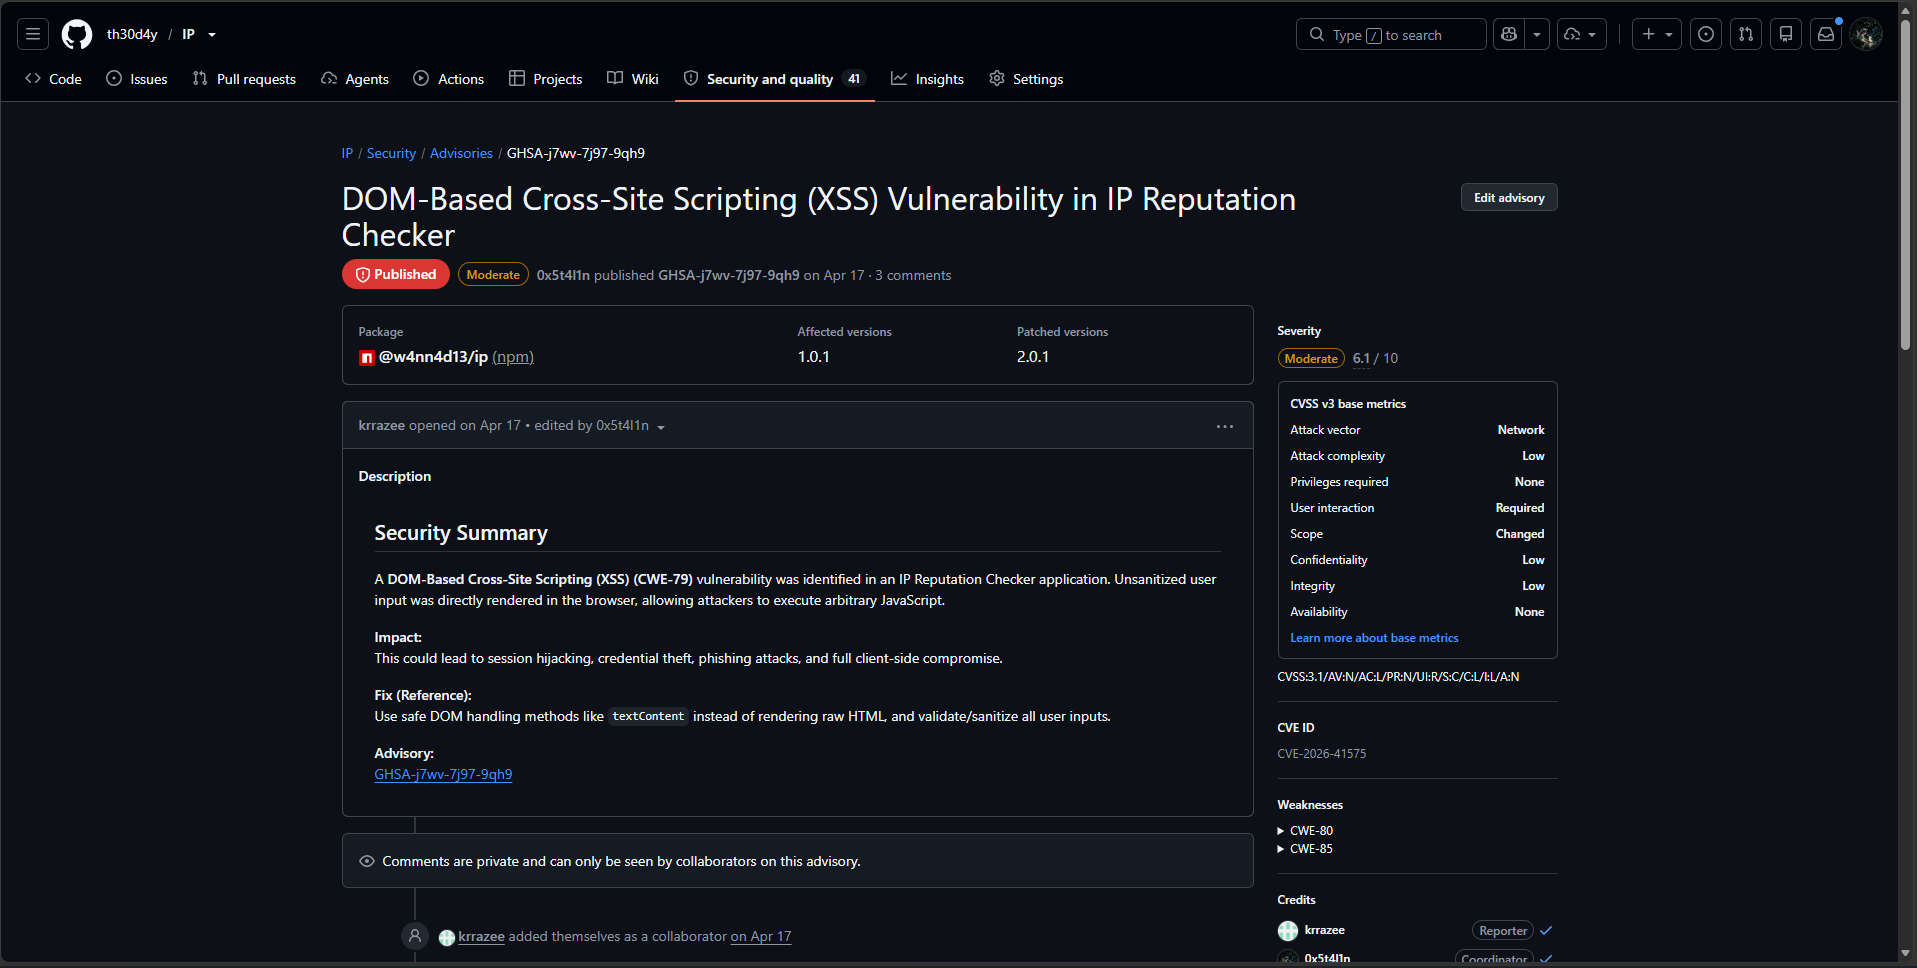
Figure 5 — The correct advisory connects the CVE to th30d4y/IP. The CVE and GHSA identifiers confirm that we followed the intended reference.
An Old Repository with a Very Recent Release
The repository looks old. In the screenshot, most visible files were last changed six months ago, some last year, and the latest commit shown is five months old. Then the sidebar offers a small detail worth noticing: v1.0.0, marked Latest, released four days ago.
Old source activity, fresh release. Suspicious, right?
That timing is a reason to inspect the release. A repository’s file listing does not tell you everything about its release assets. If you checked the old commit dates and immediately left, you walked past the fresh breadcrumb because the furniture looked dusty.
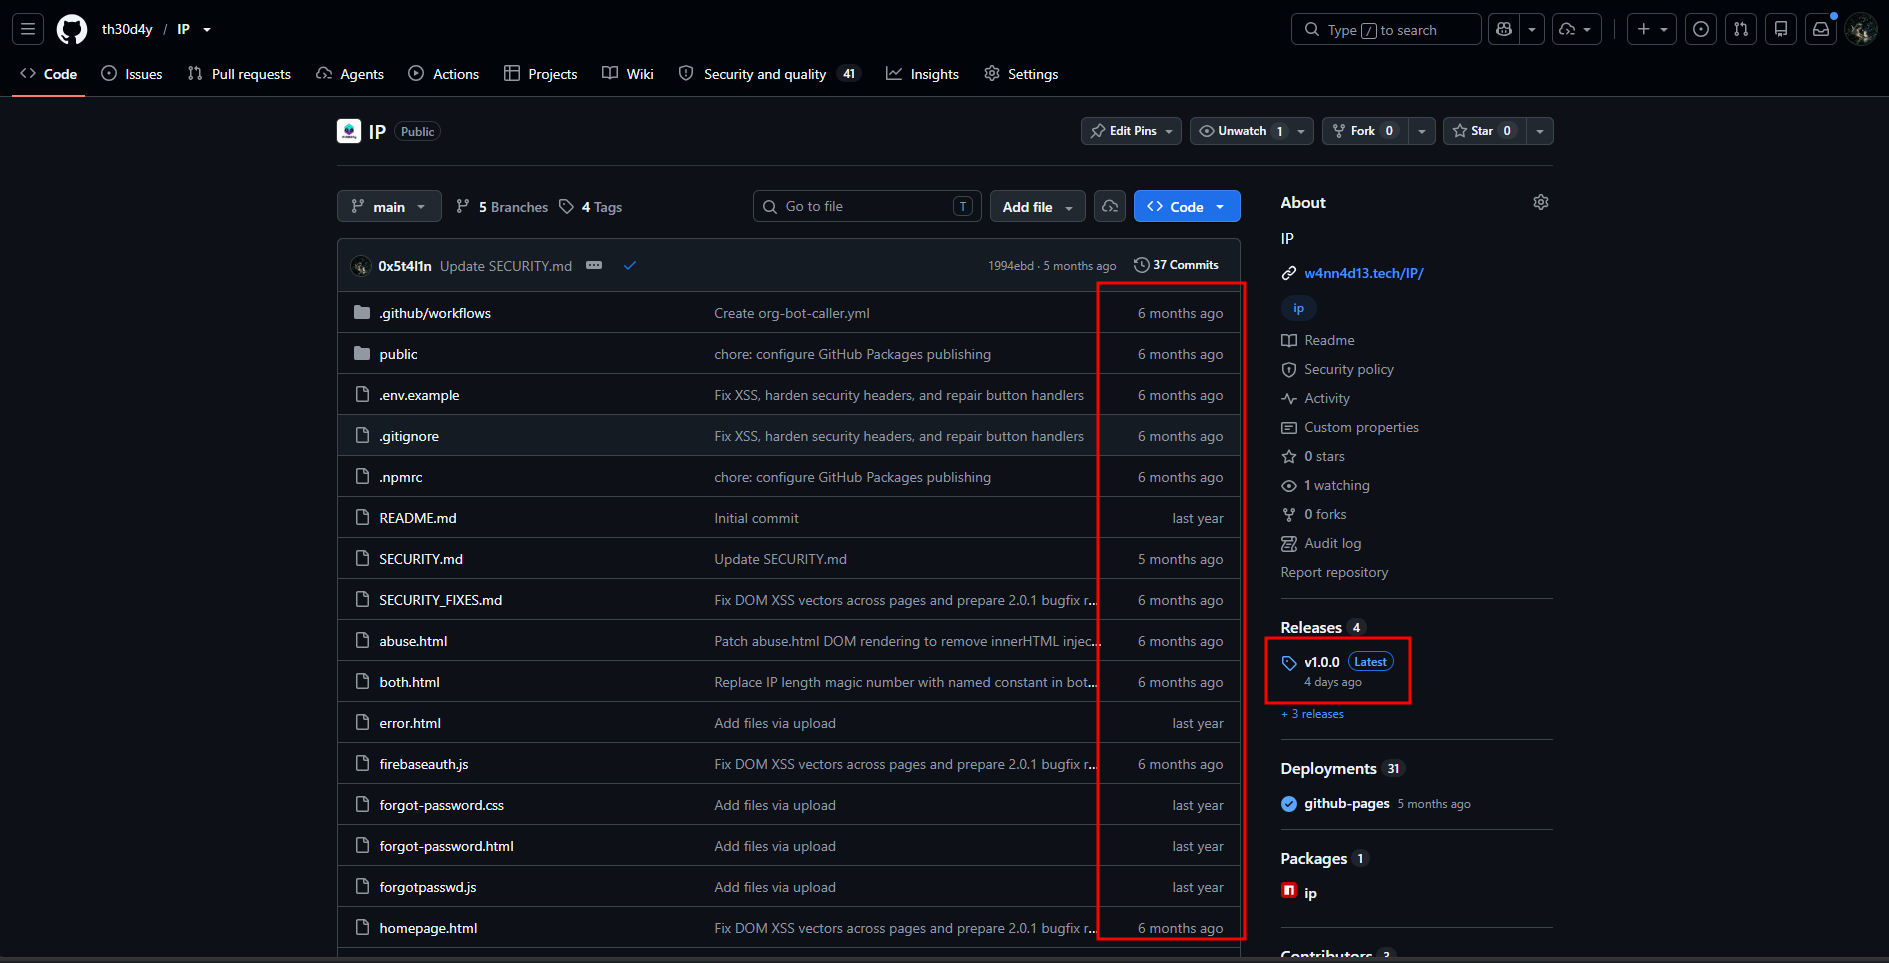
Figure 6 — The contrast that matters: months-old source activity beside a v1.0.0 release published four days before this screenshot.
Download the Release Asset
Open v1.0.0 and expand Assets. Alongside GitHub’s source-code archives is a separately attached file: ghost-in-the-weights.zip, shown as 461 KB.
Download ghost-in-the-weights.zip. Pay attention to the filename: the two Source code downloads are different archives. Clicking the first thing that says “zip” is how you create your own bonus rabbit hole.
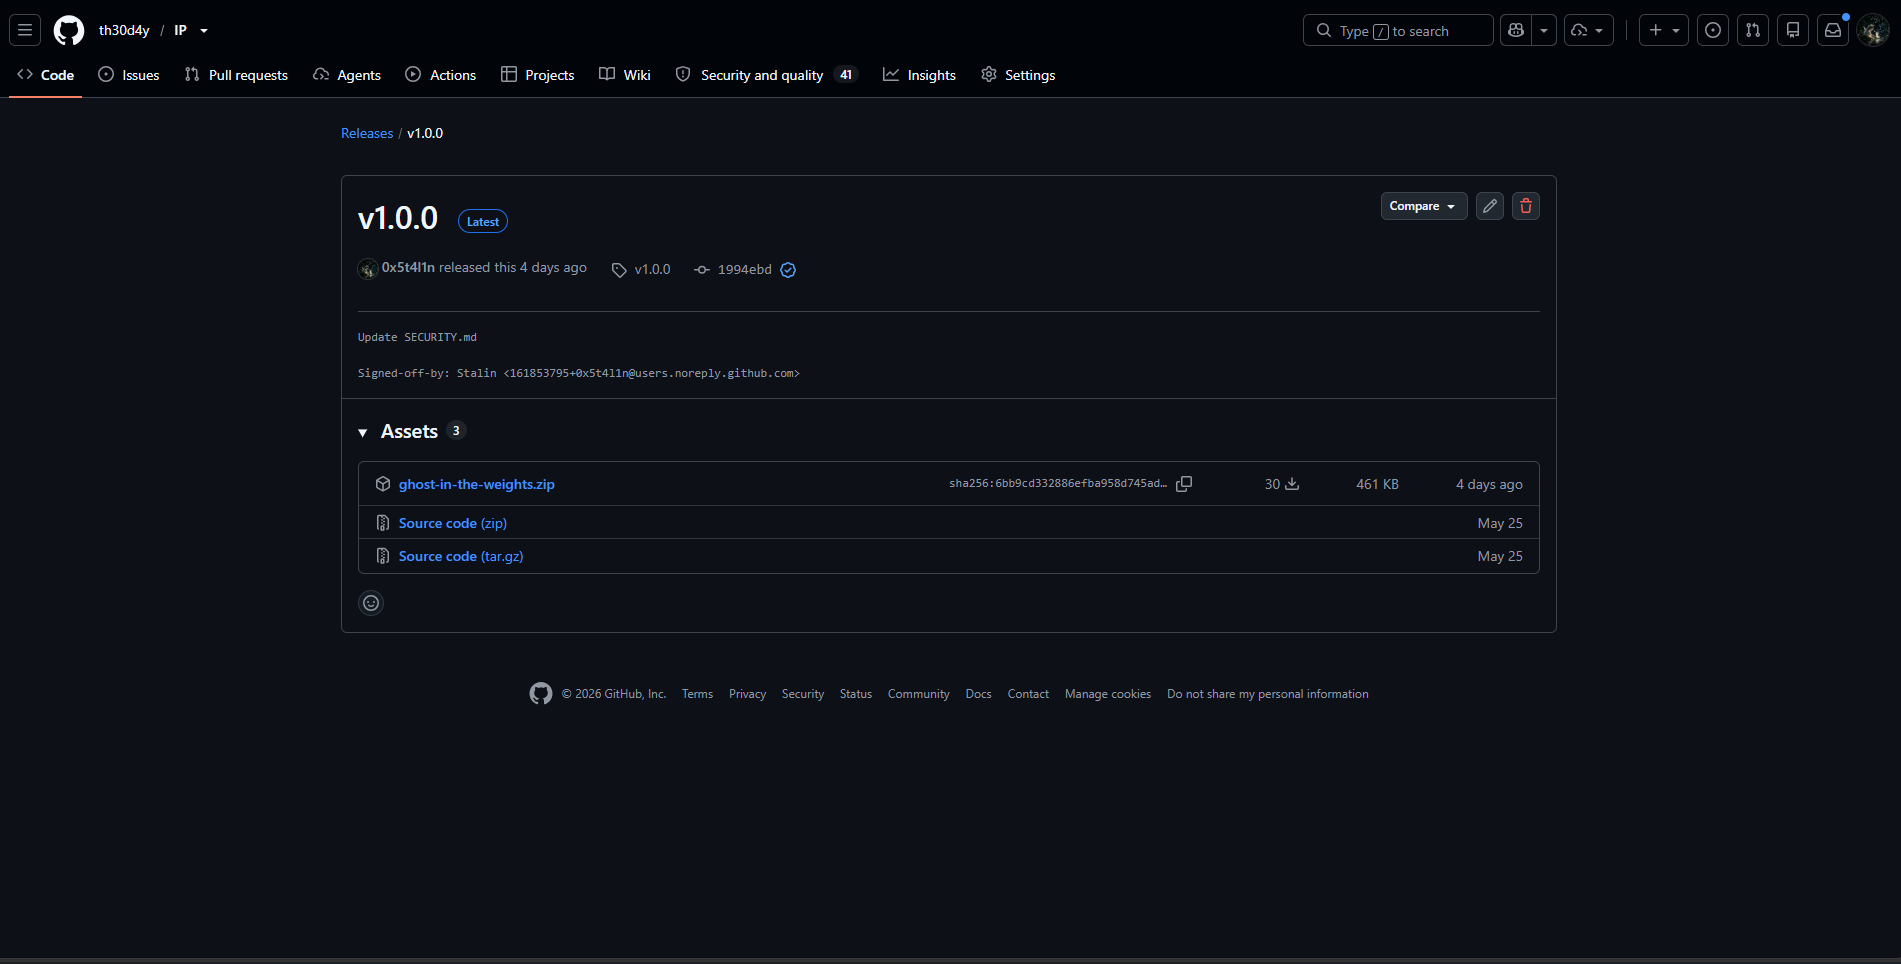
Figure 7 — The Stage 1 destination: ghost-in-the-weights.zip, attached to the v1.0.0 release.
Stage 1 ends with that archive downloaded. We followed an advisory entry, recovered from a broken reference through NVD, identified the repository, and noticed the recent release. What is inside the archive belongs to the next stage.
Stage 2 — Ghost in the Weights: AI Model Steganography
We finished Stage 1 with ghost-in-the-weights.zip. Now we have to work out why an old IP reputation project is handing us a model checkpoint.
The archive’s README gives this stage its own story: a missing researcher, a preserved neural network, and a handwritten note:
Not every weight was learned.
That sentence is doing actual work. I hid the data in the stored numbers themselves. Asking the model nicely to reveal its secrets would be a very different challenge. Please do not spend three hours prompt-injecting a file.
Unpack It Before Trying to Talk to It
Extract the archive and list its files. From the directory containing the download, for example:
python -m zipfile -e ghost-in-the-weights.zip .The extracted directory contains:
ghost-in-the-weights/
├── README.md
├── config.json
├── model.safetensors
├── inference.py
├── tokenizer.json
├── tokenizer_config.json
├── vocab.txt
└── special_tokens_map.json
The two files we need for extraction are model.safetensors and config.json. The tokenizer files support normal model use, and inference.py is a forward-pass demo. It is not the extraction script.
A tensor is an array of numbers with a shape. A list of three numbers is a one-dimensional tensor; a spreadsheet-like grid is two-dimensional. Model weights are numerical parameters used during computation, often arranged in matrices. Think of a tiny layer multiplying an input by a matrix: changing that matrix changes the calculation.
Safetensors stores named tensors, their shapes, data types, and numerical data without using pickle-based object loading. Its name describes the storage format; it does not promise that every number is innocent. The file can contain a valid model and still carry a hidden message.
Here, reading the checkpoint’s raw numerical representations is enough. We do not need to generate text, run a forward pass, or load Transformers to recover the payload.
Read the BERT Configuration
Before touching the weights, open config.json. Four fields establish the model’s architecture:
{
  "model_type": "bert",
  "hidden_size": 32,
  "num_hidden_layers": 5,
  "vocab_size": 1124
}
model_type: "bert" identifies the model family. BERT processes token representations through transformer encoder layers; the supplied inference demo loads it as a masked language model.
hidden_size: 32 means a token’s hidden representation has 32 components. As a small analogy, imagine describing each token using 32 numerical slots rather than one number. num_hidden_layers: 5 means those representations pass through five encoder layers. vocab_size: 1124 is the number of token IDs represented by the vocabulary, not a count of sentences or necessarily whole words.
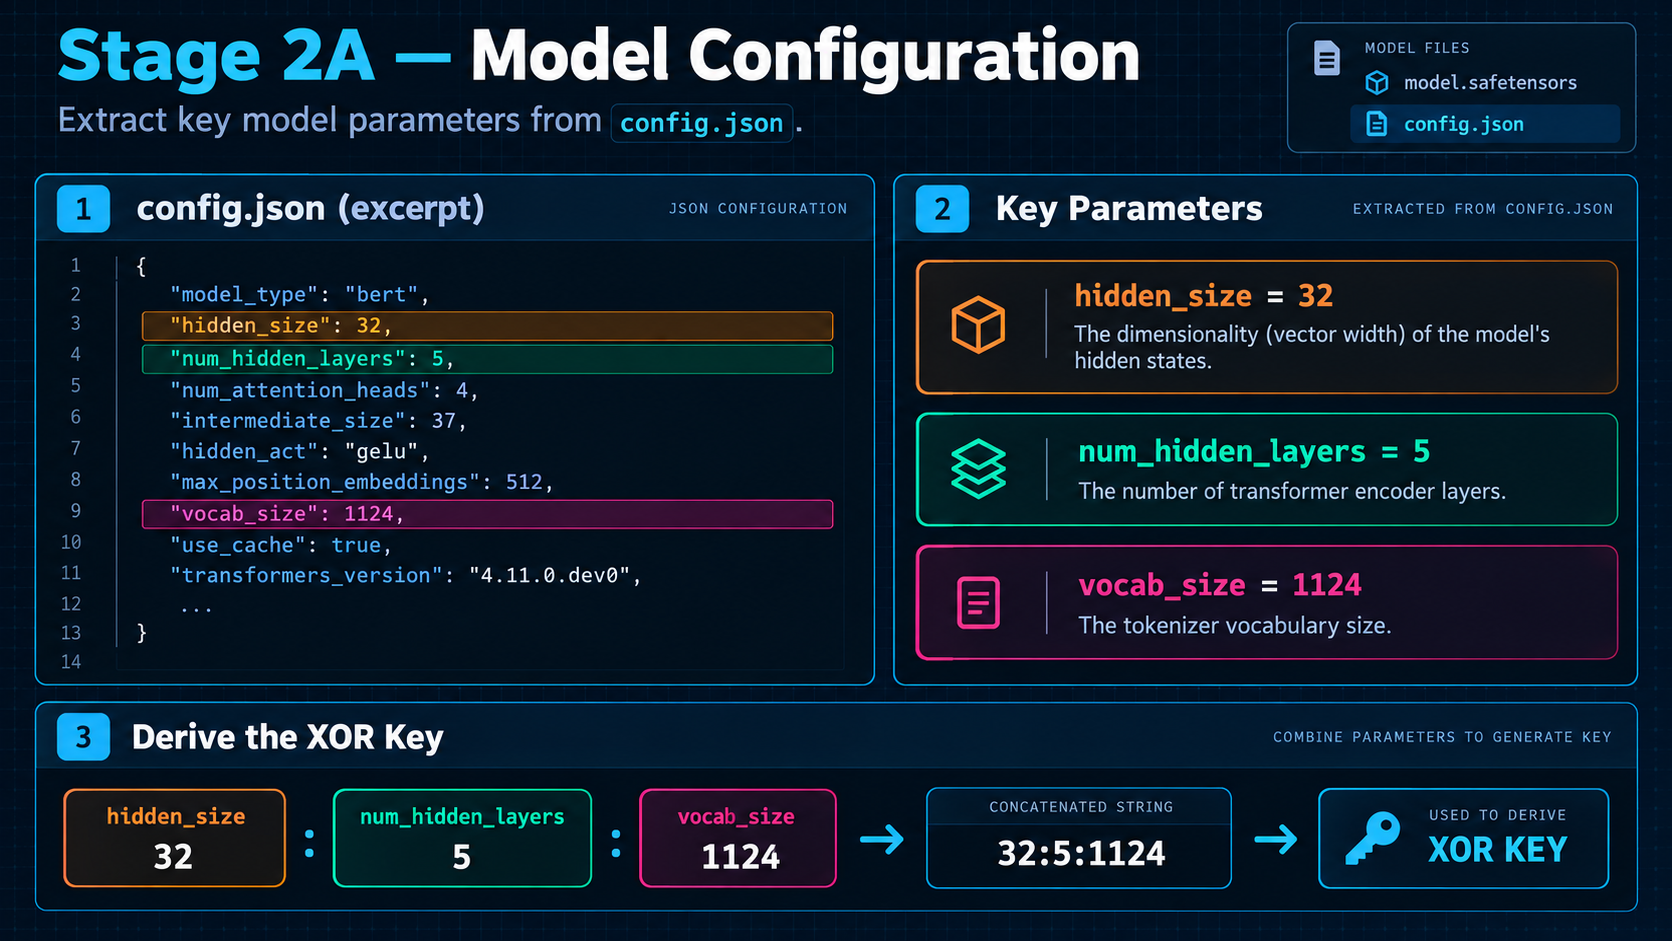
Figure 8 — The supplied configuration diagram. The highlighted values match the actual config.json in the archive.
I also used those three numerical settings as inputs to the XOR-key derivation. That is a challenge-specific rule, not something BERT normally does. The string bert tells us what architecture we are examining; it is not included in the key material.
Pull One Bit from Each Weight
The solver loads 100 tensors, then selects 40 float32 encoder weight tensors. Its exact filter requires the name to contain encoder and weight, excludes names containing bias, and checks for np.float32.
That includes encoder LayerNorm weights as well as the dense weight matrices. It excludes embeddings, bias tensors, and weights outside the encoder. “Just grab all the floats” sounds convenient until your bitstream turns into expensive confetti.
The selected names are sorted, then each tensor is flattened and the results concatenated. Flattening turns a grid such as [[a, b], [c, d]] into [a, b, c, d]. Sorting names makes the order explicit and reproducible instead of relying on how entries happen to be returned by a loader.
The result contains 32,640 float32 values. Each one can contribute one hidden bit in this scheme.
Float32: The Number and Its Stored Bits
An IEEE 754 float32 value occupies 32 bits: one sign bit, eight exponent bits, and 23 stored fraction bits. Those bits encode a floating-point number; they are not the same as an integer conversion of that number.
For example, 1.0 has the float32 representation 0x3f800000. Flipping only its lowest bit gives 0x3f800001, approximately 1.0000001192092896. The numerical difference is tiny. For ordinary finite weights, changing the lowest fraction bit moves the value to an adjacent representable value; the absolute size of that change depends on its magnitude. That does not prove that arbitrary changes preserve model quality, but it explains why data can hide in bits that barely affect the stored value.
Here is a five-weight example. Only the rightmost bit of each representation matters:
Stored representation ends in:  ...100  ...101  ...110  ...111  ...001
Extracted lowest bit:                0       1       0       1       1
Hidden bit sequence:            [0, 1, 0, 1, 1]
Now the operation in the solver makes sense:
def get_lsb(f):
    return int(f.view(np.uint32)) & 1
view(np.uint32) reinterprets the same four bytes as an unsigned integer. It does not numerically convert the float to an integer. The & 1 mask clears every bit except bit zero. Applied to an entire float32 array, the equivalent expression is f.view(np.uint32) & 1.
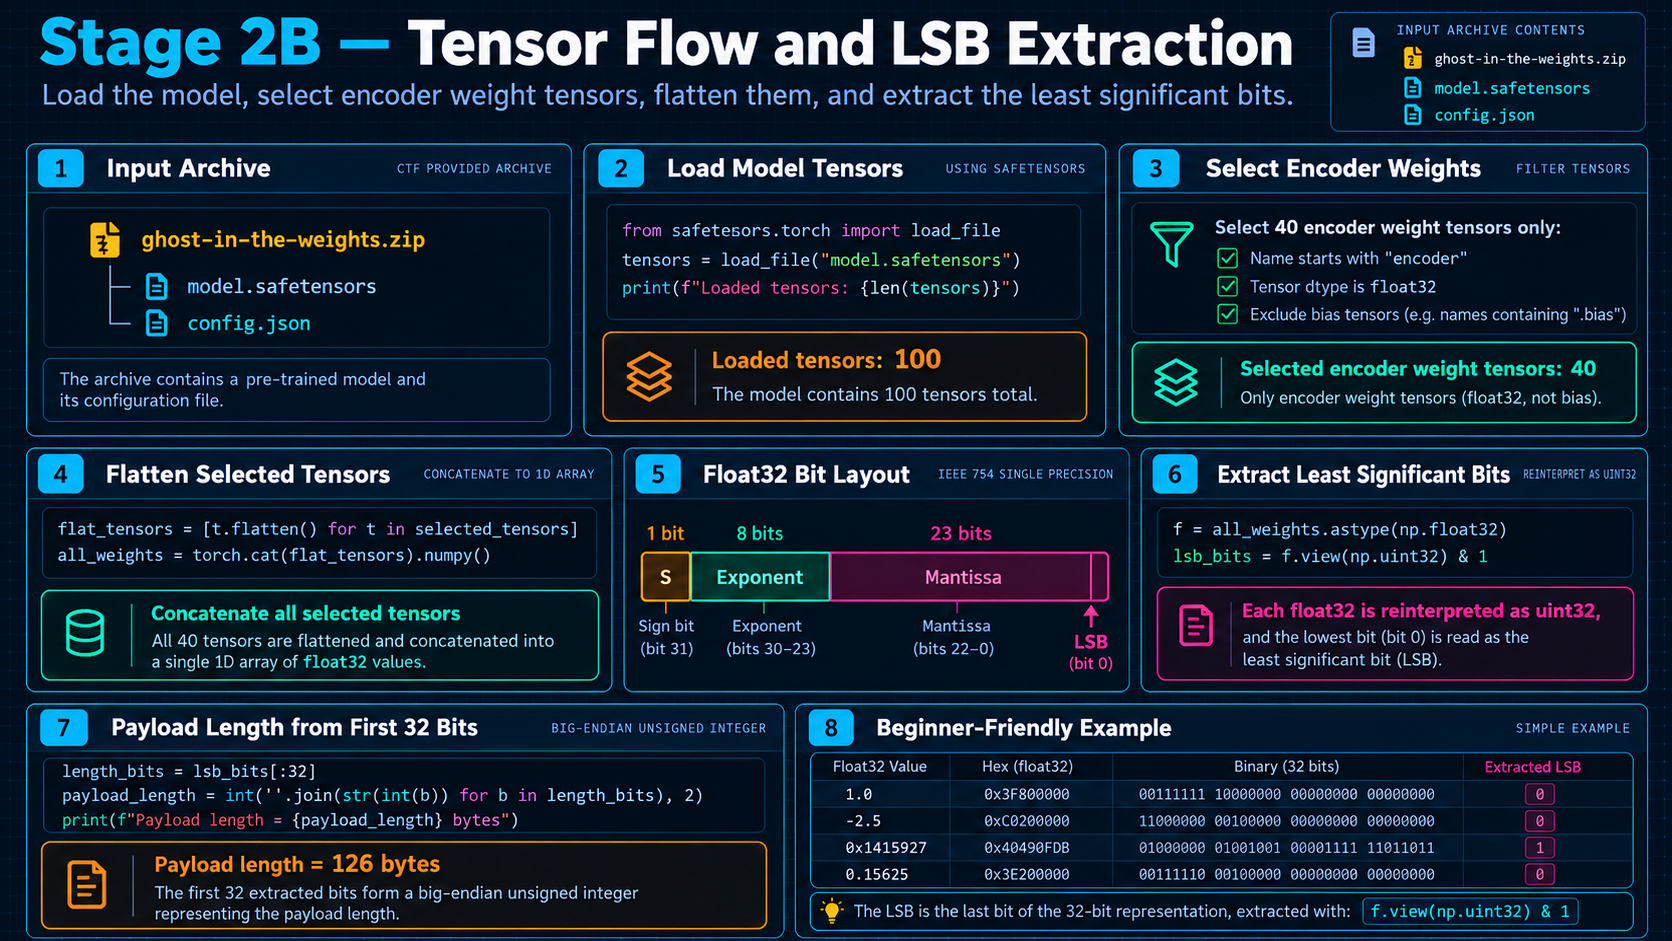
Figure 9 — The tensor-to-bit pipeline. Use the code and the five-weight example above for the bit arithmetic; the supplied illustration contains inconsistent values in its small float example table.
The First 32 Bits Are a Length Header
The first 32 extracted bits are reserved for an unsigned big-endian payload length. Most-significant bit first, a byte sequence 00 00 00 7e means 126. NumPy’s default packbits bit order and struct.unpack('>I', ...) reconstruct that value:
length_bits = [get_lsb(flat[i]) for i in range(32)]
payload_len = struct.unpack('>I', np.packbits(length_bits).tobytes())[0]
The actual length is 126 bytes, so we read 1,008 payload bits after the header. Together they occupy 1,040 weights, comfortably within the 32,640 selected values. The header itself stays outside the permutation; it tells the solver how many following bits to collect.
Put the Shuffled Bits Back in Order
Extracting the bits does not immediately give readable bytes. I shuffled the payload bits before storing them, so the solver has to reproduce that ordering and undo it.
Start with five letters as stand-ins for five bit positions:
Original:     [A, B, C, D, E]
perm:         [3, 0, 4, 2, 1]
Shuffled:     [D, A, E, C, B]   = original[perm]
inv_perm:     [1, 4, 3, 0, 2]
Restored:     [A, B, C, D, E]   = shuffled[inv_perm]
The seed comes from summing the number of elements in all 100 stored tensors, not just the selected weights:
perm_seed = sum(v.size for v in tensors.values()) % (2**32)For this checkpoint, the sum is 126851, so the modulo operation leaves it unchanged. This count includes the stored integer position-ID tensor and other unselected tensors. Calling it the total parameter count is convenient shorthand in the original script; precisely, it is the total stored tensor-element count, which can include model buffers.
The solver explicitly creates Generator(PCG64(126851)), then calls rng.permutation(1008). That returns an ordering of the indices from 0 through 1007. With the same seed, generator setup, and sequence of calls in a compatible NumPy environment, we can reproduce the ordering. PCG64 is a deterministic pseudorandom generator, not encryption. No secret is supplied by a seed that we can calculate from the checkpoint.
The inverse is built with:
inv_perm = np.empty_like(perm)
inv_perm[perm] = np.arange(payload_len * 8)
For each original index, that assignment records where it ended up in the shuffled array. Applying payload_bits[inv_perm] restores the original sequence. Only then do we pack those bits into bytes.
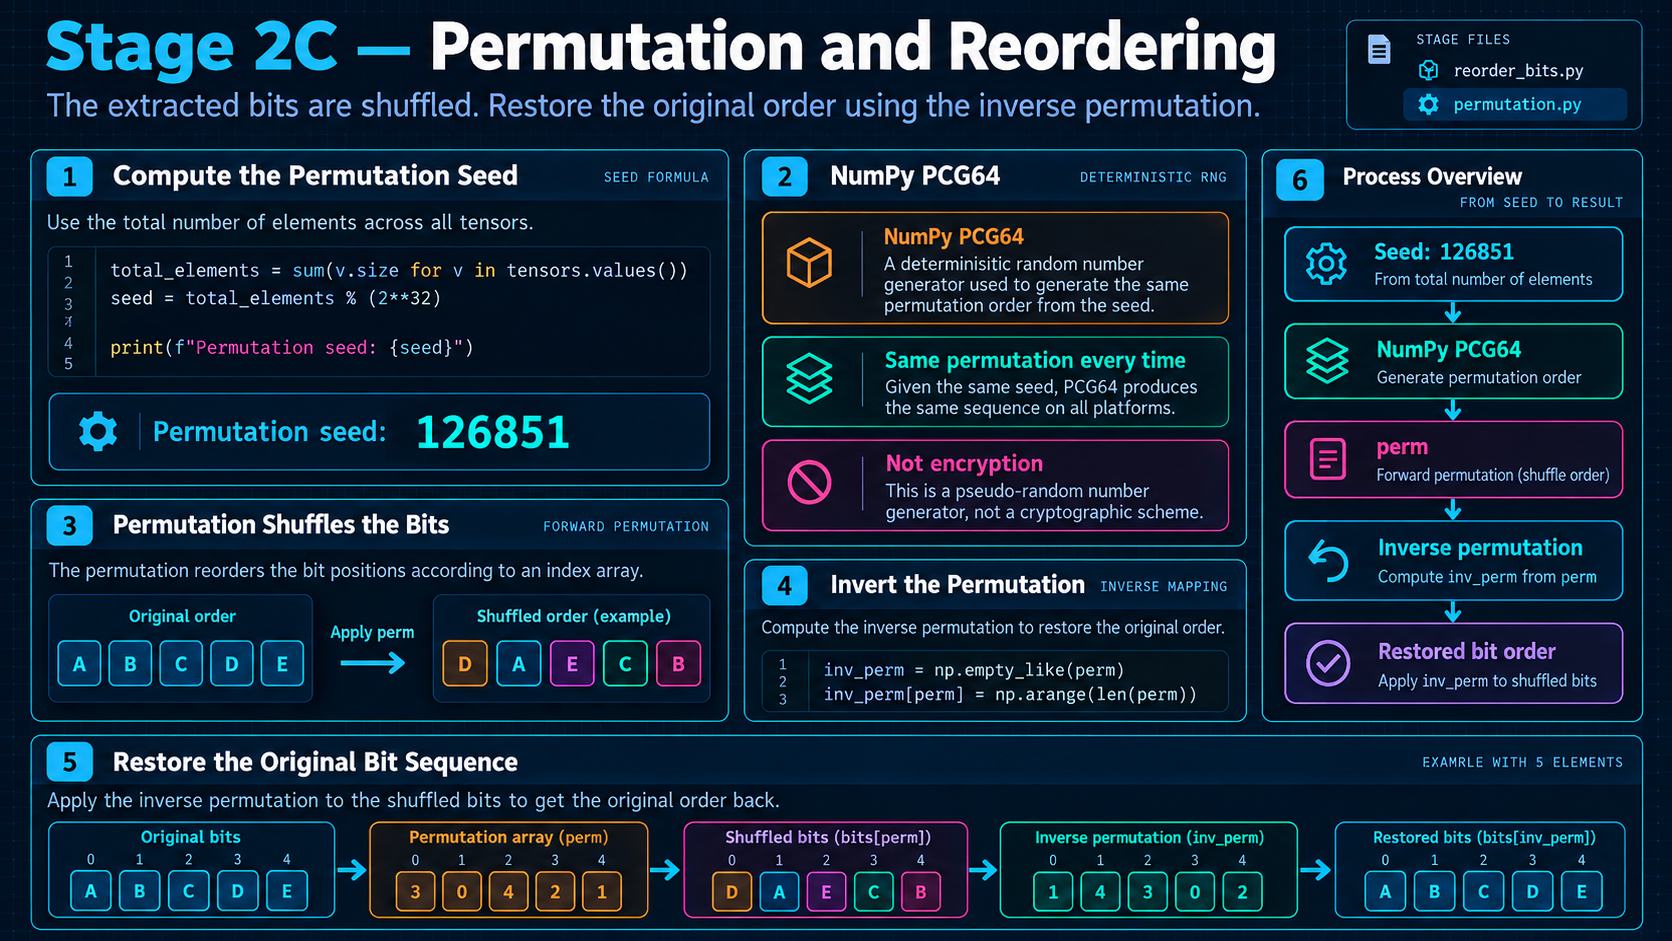
Figure 10 — Undoing the ordering with an inverse permutation. Reproduction depends on the same generator and calls, not merely on using any random-number generator with seed 126851.
Derive the Key, Then Undo the XOR
The restored bytes are still XOR-masked. This is where the configuration comes back into the investigation.
Take the decimal values in this exact order: hidden size, layer count, vocabulary size. Join them with colons, without spaces or a trailing newline:
32 + ":" + 5 + ":" + 1124 → "32:5:1124"Encoding that string as UTF-8 produces nine bytes:
key_material = b"32:5:1124"
# Hex bytes: 33 32 3a 35 3a 31 31 32 34
The characters are all ASCII, so each occupies one byte in UTF-8. Spaces, different separators, or a trailing newline would change the input and therefore the key.
The script builds it from the configuration rather than hard-coding it:
key_material = (
    f"{config['hidden_size']}:{config['num_hidden_layers']}:"
    f"{config['vocab_size']}"
).encode()
xor_key = hashlib.sha256(key_material).digest()
Python’s encode() defaults to UTF-8. SHA-256 hashes those input bytes into a 256-bit digest. Eight bits make a byte, so the result is 32 bytes. Written as hexadecimal, each byte needs two characters, giving this verified 64-character value:
249328c59efef3973e50c2ef2c7214bebbcb520fbb993e41d0f1e870b0531975digest() supplies the raw 32 bytes for XOR. hexdigest() or xor_key.hex() is their printable representation; using those 64 text characters as the key would produce a different result.
SHA-256 and XOR have separate jobs here. Hashing derives the key bytes from the configuration; it does not decrypt the payload. SHA-256 is not a reversible transformation where we later “unhash” a message. XOR is the reversible masking operation applied to the payload bytes.
At the bit level, XOR produces 1 when its inputs differ and 0 when they agree. Applying the same key twice cancels it out:
0x41 XOR 0x2A = 0x6B
0x6B XOR 0x2A = 0x41

(message XOR key) XOR key = message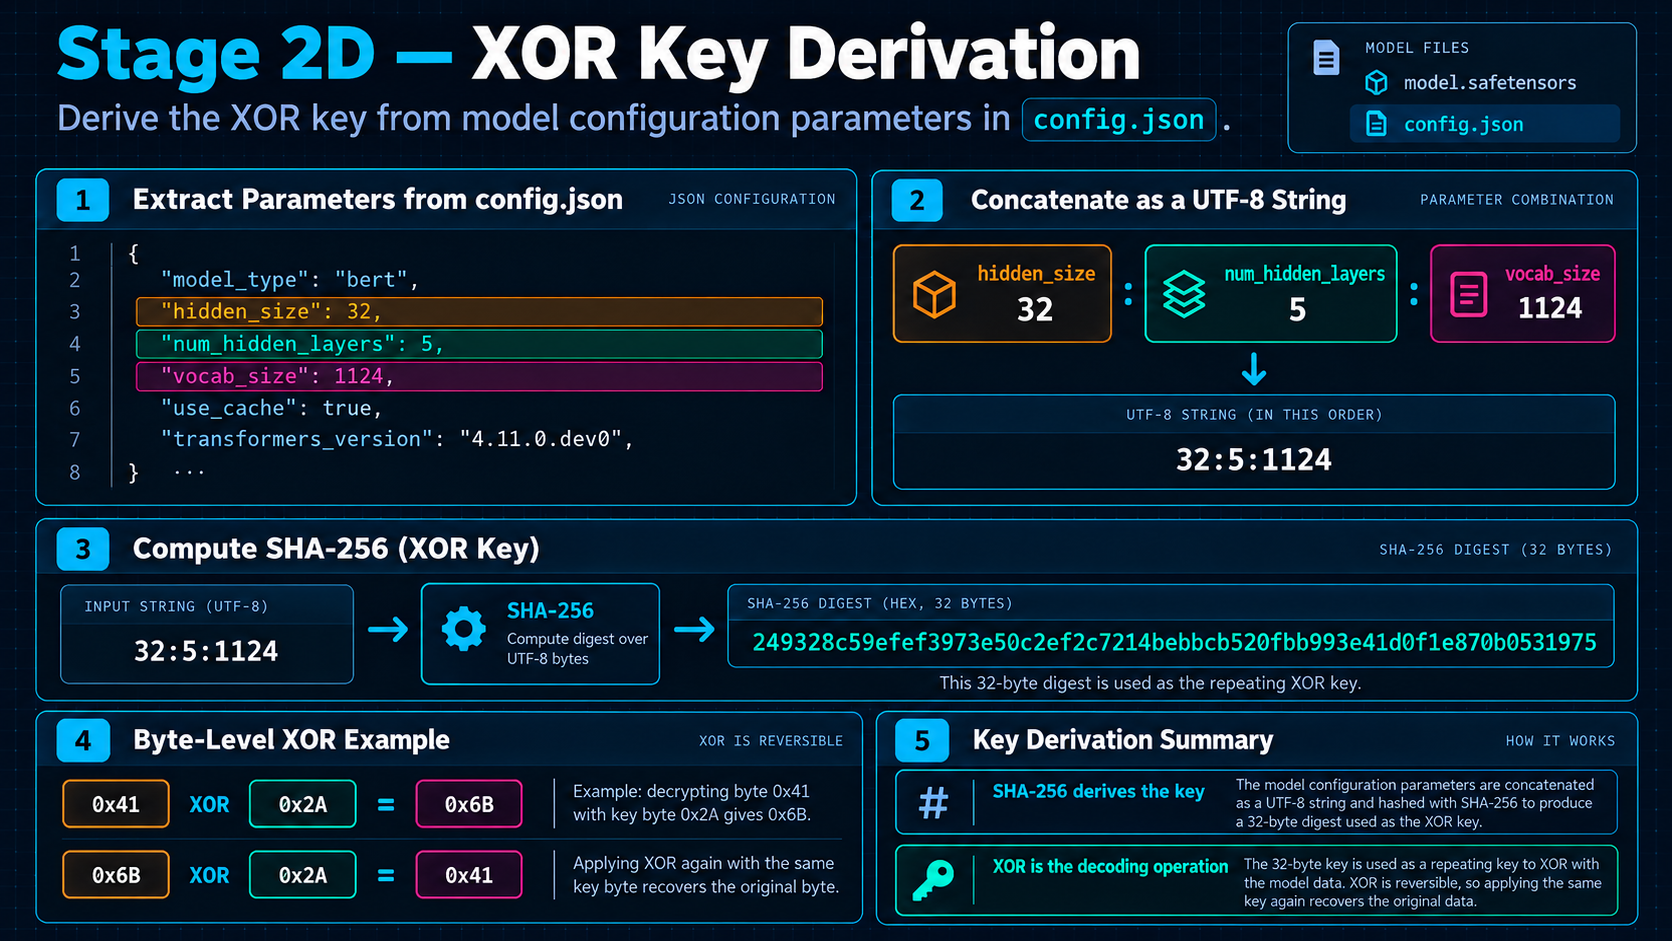
Figure 11 — SHA-256 derives the 32-byte key; XOR applies it. These are two distinct operations.
The payload has 126 bytes, but the key has only 32. The script cycles through the key:
decoded = bytes(b ^ xor_key[i % 32] for i, b in enumerate(xored_bytes))At payload index 0, use key byte 0. At index 31, use key byte 31. At index 32, 32 % 32 is zero, so start again at key byte 0. Index 65 uses key byte 1. The modulo operation keeps the index in the range 0–31 throughout.
This repeated-key XOR is an obfuscation layer in the challenge. The key material is recoverable from public model settings, and repeating a short key does not provide modern cryptographic protection. A SHA-256 digest in the middle does not magically upgrade everything around it.
Check the Payload Before Celebrating
After decoding, the byte layout is:
[4-byte flag length, big-endian][flag bytes][4-byte CRC32, big-endian]There are two separate lengths in this stage. The outer LSB header says the encoded payload is 126 bytes. The first four decoded bytes say the inner flag-looking string is 118 bytes. The arithmetic checks out: 4 + 118 + 4 = 126.
For a miniature example, if the inner length were 3, we would read three bytes immediately after the length field, then the next four bytes as the stored checksum. We would not search for a closing brace and hope we picked the right boundary.
The solver calculates CRC32 over only the flag bytes, then compares it with the stored checksum:
flag_len = struct.unpack('>I', decoded[:4])[0]
flag_bytes = decoded[4 : 4 + flag_len]
stored_crc = struct.unpack('>I', decoded[4 + flag_len : 8 + flag_len])[0]
computed_crc = zlib.crc32(flag_bytes) & 0xFFFFFFFF
The mask keeps the computed value in the unsigned 32-bit range. A match gives us a useful consistency check across extraction, ordering, and decoding. CRC32 is an integrity check, not encryption or proof of authenticity. Someone who changes a payload can also calculate a new checksum.
The Complete Solver
Here is my extraction script with the same download URL, tensor selection, bit order, permutation, key derivation, and checksum calculation. I added bounds checks before reading the payload and parsing its fields, plus a clear failure on CRC mismatch. The successful extraction behavior stays the same.
Run it in a fresh working directory with Python and pip available. It downloads the release as ghost.zip and extracts the archive there. For the verification behind this writeup, I used the already downloaded ZIP and the same extraction algorithm instead of fetching it again; no model inference was run.
The script follows the sections above: acquire the files, load and filter the tensors, read the length and bits, undo the shuffle, derive the key, XOR, then parse and check. The final Base64 step is deliberately separate so we can inspect what the extractor actually recovered.
import subprocess
subprocess.run(["pip", "install", "safetensors", "numpy", "-q"], check=True)

import urllib.request, zipfile, os, struct, json, hashlib, zlib
import numpy as np
from safetensors import safe_open

# 1. Download the original release asset.
print("[1] Downloading...")
urllib.request.urlretrieve(
    "https://github.com/th30d4y/IP/releases/download/v1.0.0/ghost-in-the-weights.zip",
    "ghost.zip"
)

# 2. Extract into the working directory.
print("[2] Extracting...")
with zipfile.ZipFile("ghost.zip", "r") as z:
    z.extractall(".")

base = "ghost-in-the-weights"

# 3. Read the checkpoint as NumPy tensors; do not execute the model.
print("[3] Loading tensors...")
tensors = {}
with safe_open(f"{base}/model.safetensors", framework="np") as f:
    for k in f.keys():
        tensors[k] = f.get_tensor(k)
print(f"    Loaded {len(tensors)} tensors")

# 4. Select and deterministically order encoder weights.
selected = sorted([
    k for k in tensors
    if "encoder" in k and "weight" in k and "bias" not in k
    and tensors[k].dtype == np.float32
])
print(f"[4] Selected {len(selected)} encoder weight tensors")
if not selected:
    raise ValueError("No matching float32 encoder weight tensors")

flat = np.concatenate([tensors[k].flatten() for k in selected])

def get_lsb(f):
    return int(f.view(np.uint32)) & 1

# 5. Read the unshuffled length header and check available capacity.
if flat.size < 32:
    raise ValueError("Not enough selected weights for the length header")
length_bits = [get_lsb(flat[i]) for i in range(32)]
payload_len = struct.unpack('>I', np.packbits(length_bits).tobytes())[0]
print(f"[5] Payload length: {payload_len} bytes")
if payload_len < 8:
    raise ValueError("Payload is too short for length and CRC32 fields")
if payload_len * 8 > flat.size - 32:
    raise ValueError("Payload length exceeds selected tensor capacity")

payload_bits = np.array([
    get_lsb(flat[32 + i]) for i in range(payload_len * 8)
])

# 6. Count all stored tensor elements and reverse the bit permutation.
perm_seed = sum(v.size for v in tensors.values()) % (2**32)
print(f"[6] Permutation seed: {perm_seed}")
rng = np.random.Generator(np.random.PCG64(perm_seed))
perm = rng.permutation(payload_len * 8)
inv_perm = np.empty_like(perm)
inv_perm[perm] = np.arange(payload_len * 8)
xored_bytes = np.packbits(payload_bits[inv_perm]).tobytes()

# 7. Derive the original configuration-based key and XOR decode.
with open(f"{base}/config.json") as f:
    config = json.load(f)
key_material = (
    f"{config['hidden_size']}:{config['num_hidden_layers']}:"
    f"{config['vocab_size']}"
).encode()
xor_key = hashlib.sha256(key_material).digest()
print(f"[7] XOR key: {xor_key.hex()}")
decoded = bytes(b ^ xor_key[i % 32] for i, b in enumerate(xored_bytes))

# 8. Validate field boundaries before parsing the inner payload.
if len(decoded) < 8:
    raise ValueError("Decoded payload is too short")
flag_len = struct.unpack('>I', decoded[:4])[0]
if flag_len > len(decoded) - 8:
    raise ValueError("Flag length leaves insufficient bytes for the CRC32")
flag_bytes = decoded[4 : 4 + flag_len]
stored_crc = struct.unpack('>I', decoded[4 + flag_len : 8 + flag_len])[0]
computed_crc = zlib.crc32(flag_bytes) & 0xFFFFFFFF

print(f"[8] CRC32 match: {computed_crc == stored_crc}")
if computed_crc != stored_crc:
    raise ValueError("CRC32 mismatch: check the artifact and extraction steps")
print()
print("=" * 60)
print("FLAG:", flag_bytes.decode("utf-8"))
print("=" * 60)
The bounds checks matter because a wrong tensor order or damaged header can produce a plausible-looking integer that requests far more bits than exist. Checking payload_len * 8 <= flat.size - 32 catches that before indexing. The inner length gets its own check because the decoded bytes must have room for both the claimed string and its four-byte checksum.
A Flag That Gives You Another Link
The verified extraction values are:
Loaded tensors: 100
Selected encoder weight tensors: 40
Payload length: 126 bytes
Permutation seed: 126851
XOR key: 249328c59efef3973e50c2ef2c7214bebbcb520fbb993e41d0f1e870b0531975
CRC32 match: True
The exact flag-looking output is:
flag{aHR0cHM6Ly9kcml2ZS5nb29nbGUuY29tL2ZpbGUvZC8xVXNFZ2daMmhuOC1LRjZZZ0plRW80dFlsWlZGZ2V1b2cvdmlldz91c3A9c2hhcmluZw==}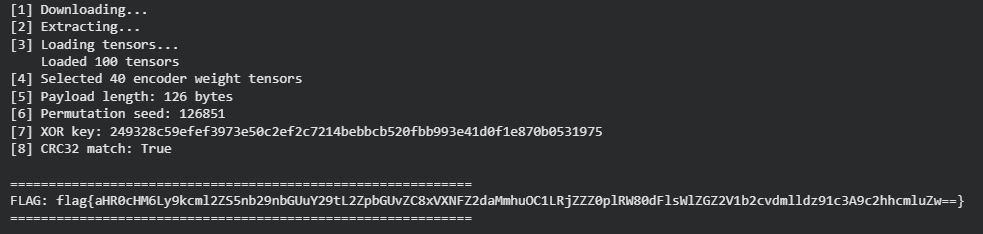
Figure 12 — The supplied extraction output. Running the extraction algorithm against the local archive reproduced the same string and validation values.
Congratulations, you extracted a flag. Unfortunately, the flag decided to become a Google Drive link.
The archive’s README uses flag{...} for its local objective, but the overall CTF format is WiCySxEx0rcists{}. More importantly, the text inside these braces is Base64-encoded data. Base64 is an encoding, not another encryption layer; decoding it needs no secret key.
Copy only the text between the braces, leaving out FLAG:, flag{, and the closing }. In CyberChef, paste that text into Input and add From Base64 to the recipe. The standard Base64 alphabet is sufficient. Do not paste the wrapper and rely on “Remove non-alphabet chars”: the letters in flag are themselves valid Base64 characters and would contaminate the input.
The equivalent Python operation, using the recovered string, is:
import base64

flag_text = flag_bytes.decode("utf-8")
if not (flag_text.startswith("flag{") and flag_text.endswith("}")):
    raise ValueError("Unexpected flag wrapper")
encoded = flag_text[len("flag{"):-1]
drive_url = base64.b64decode(encoded, validate=True).decode("utf-8")
print(drive_url)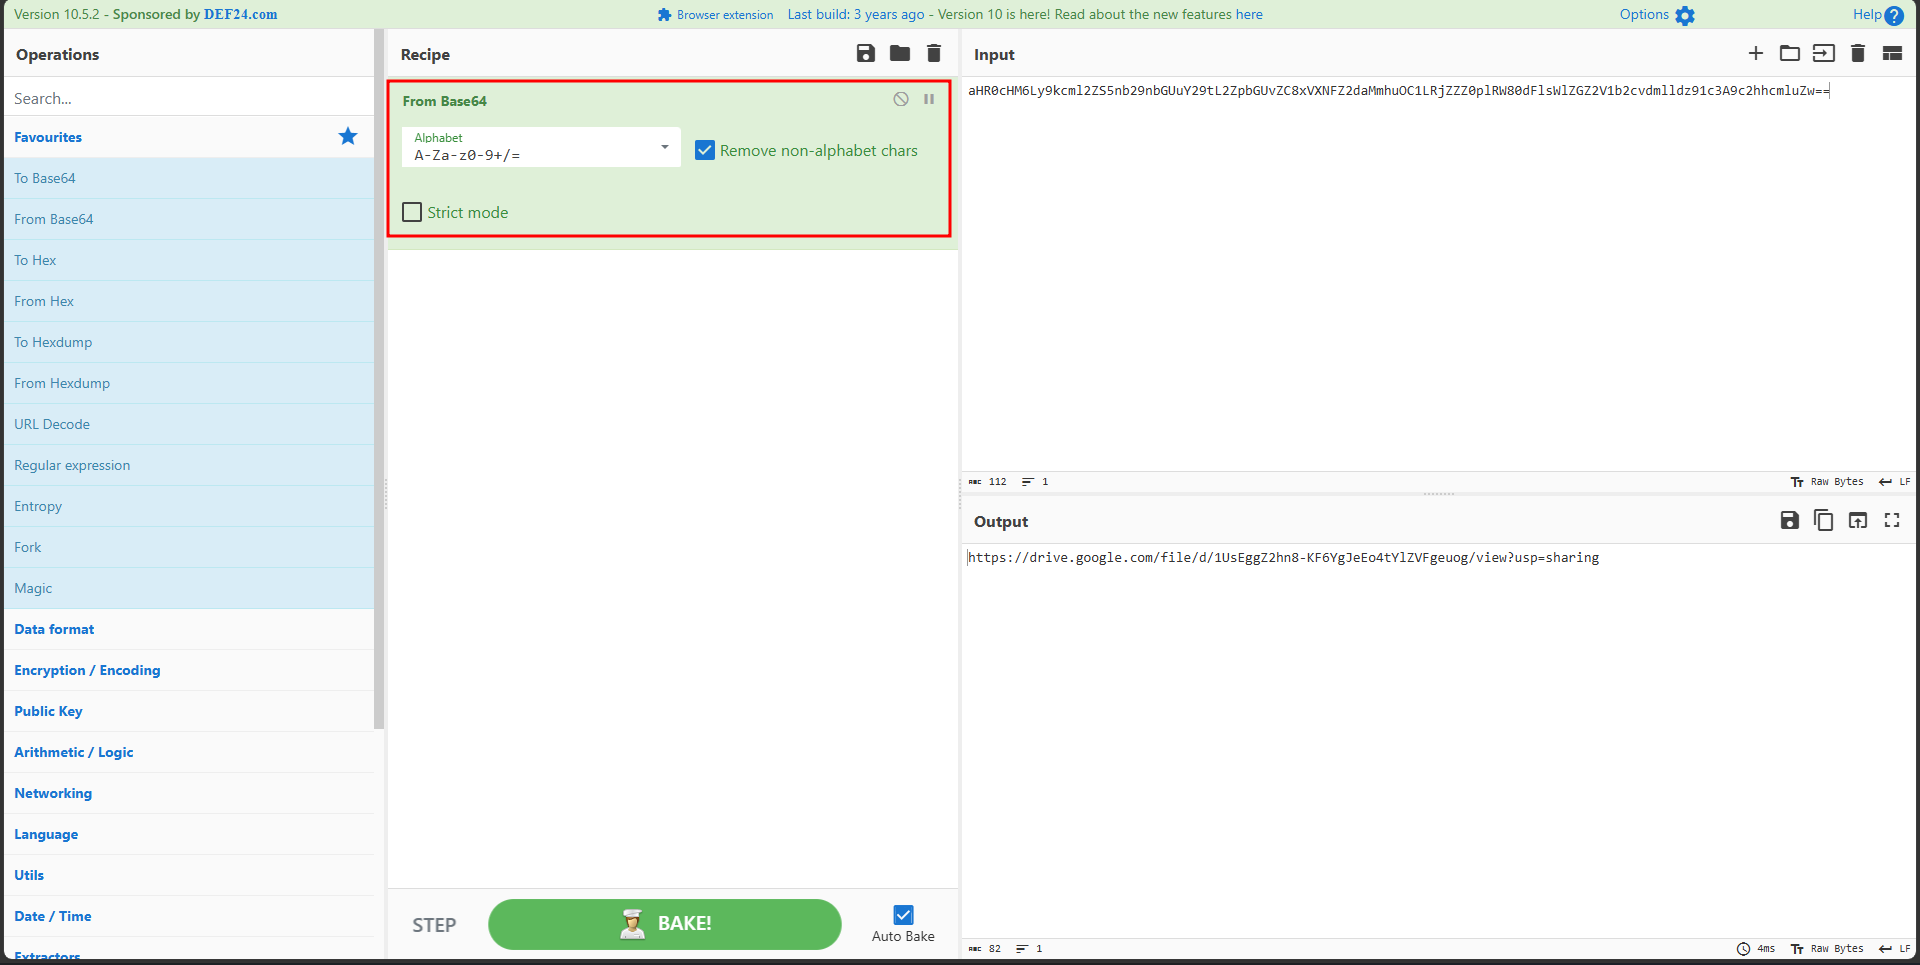
Figure 13 — From Base64 reveals a Google Drive file URL. The output matches the locally verified decoding.
https://drive.google.com/file/d/1UsEggZ2hn8-KF6YgJeEo4tYlZVFgeuog/view?usp=sharingThat is a file location, not the final CTF answer. Stage 2 ends with this recovered Google Drive URL.
Stage 3 — ELF Reverse Engineering
From Google Drive to a Linux Game
The Google Drive link recovered in Stage 2 provides the forgotten-access Linux executable directly. Download that binary and open a terminal in the directory where you saved it:
cd ~/Downloads
ls -l forgotten-access
To launch it in a Linux desktop session:
chmod +x forgotten-access
./forgotten-access
These are the player-side commands. For this writeup, I inspected the supplied ELF statically and ran the reconstructed Python decoder; I did not launch the game. The screenshots below document the supplied gameplay and terminal session.
Shoot Asteroids, Notice the Clue
The game is a playable Asteroids-style shooter, identified in its strings as Naquadah Asteroids. Move the ship, shoot the rocks, and watch the score. I gave you a playable game to relax. Somehow, you ended up analyzing assembly instructions instead.
The controls are straightforward:
| Key | Action |
|---|---|
| WASD or arrow keys | Move the ship |
| Space | Shoot |
| P | Pause |
| Escape | Quit |
At score 13, the diagnostic clue appears. The gameplay capture marks that score, followed by the in-game message LEGACY SYNC DETECTED.
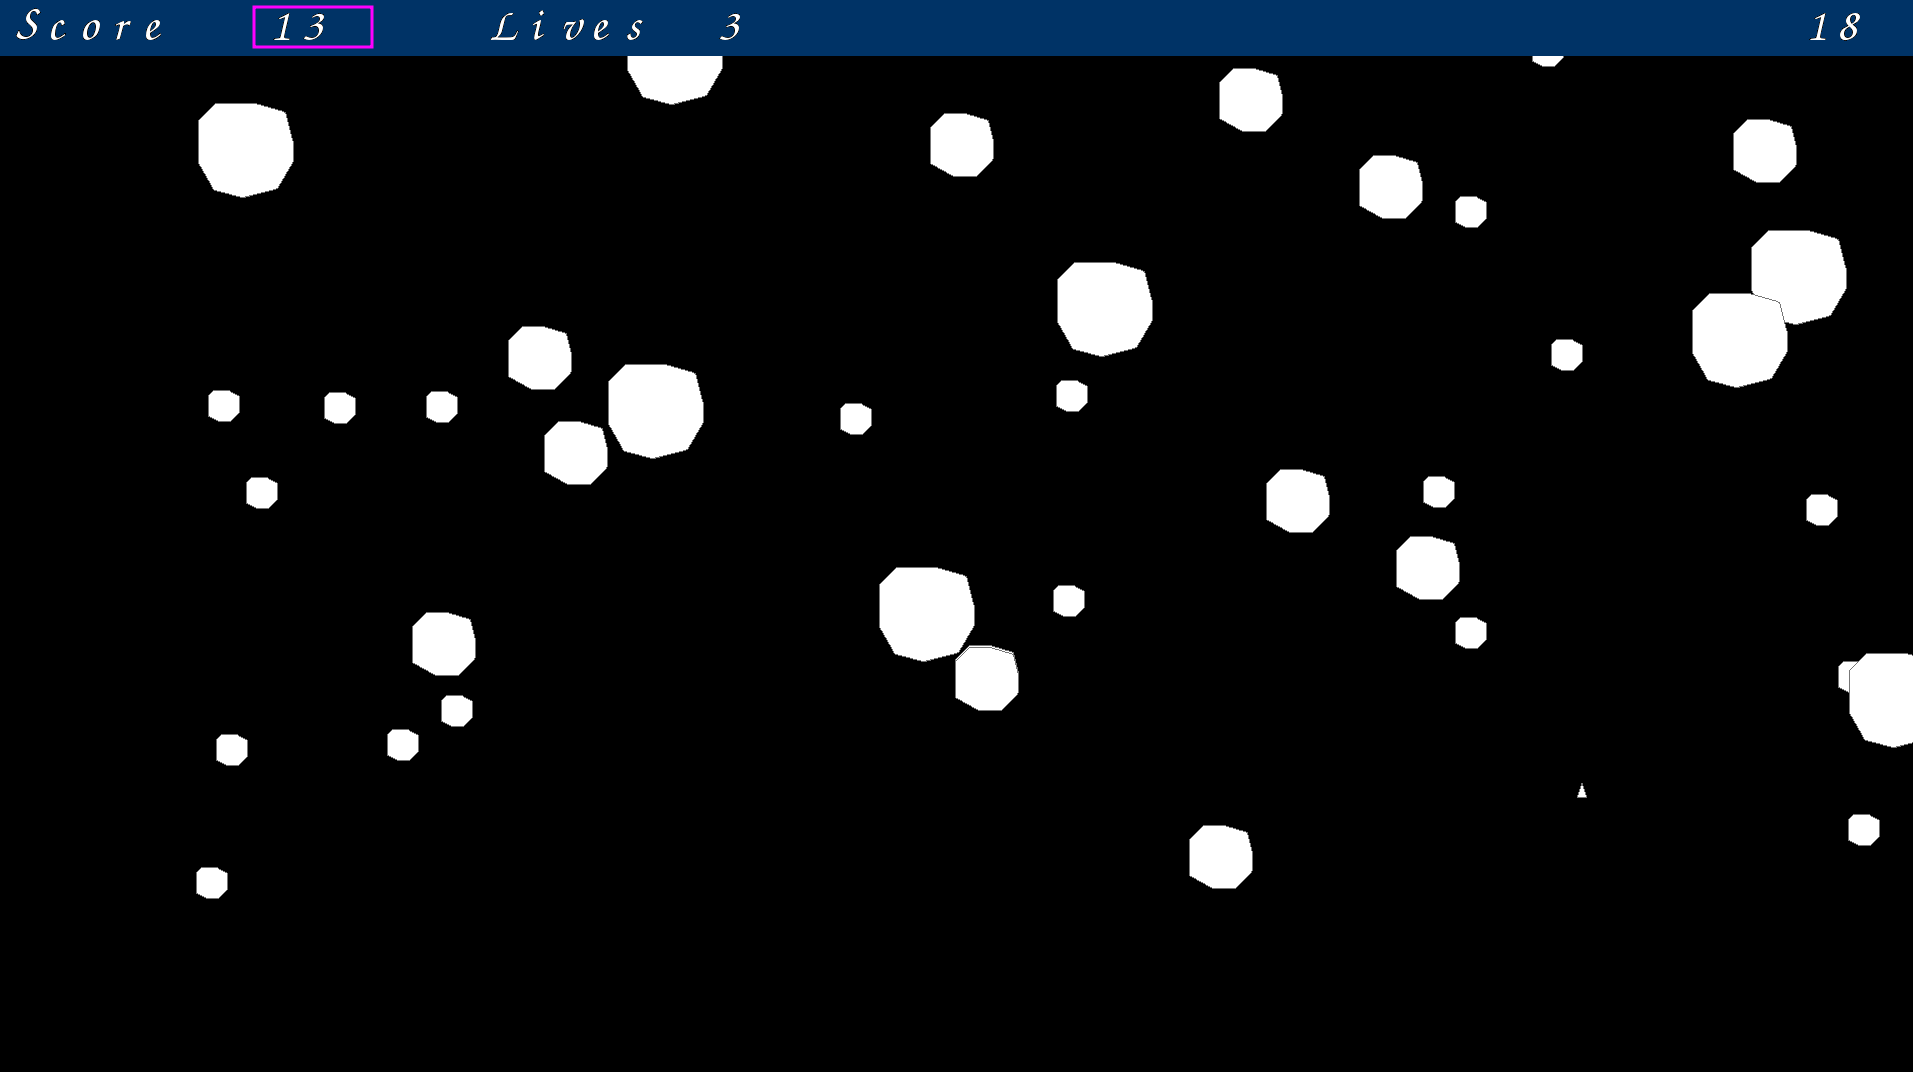
Figure 15 — Score 13: the gameplay milestone that triggers the diagnostic clue.

Figure 16 — LEGACY SYNC DETECTED is the visible clue. It is not the decoded payload.
Only after reaching score 13 do the legacy diagnostics appear in the terminal. They are triggered by that gameplay milestone, not by simply launching the executable. Check the terminal used to run the game:
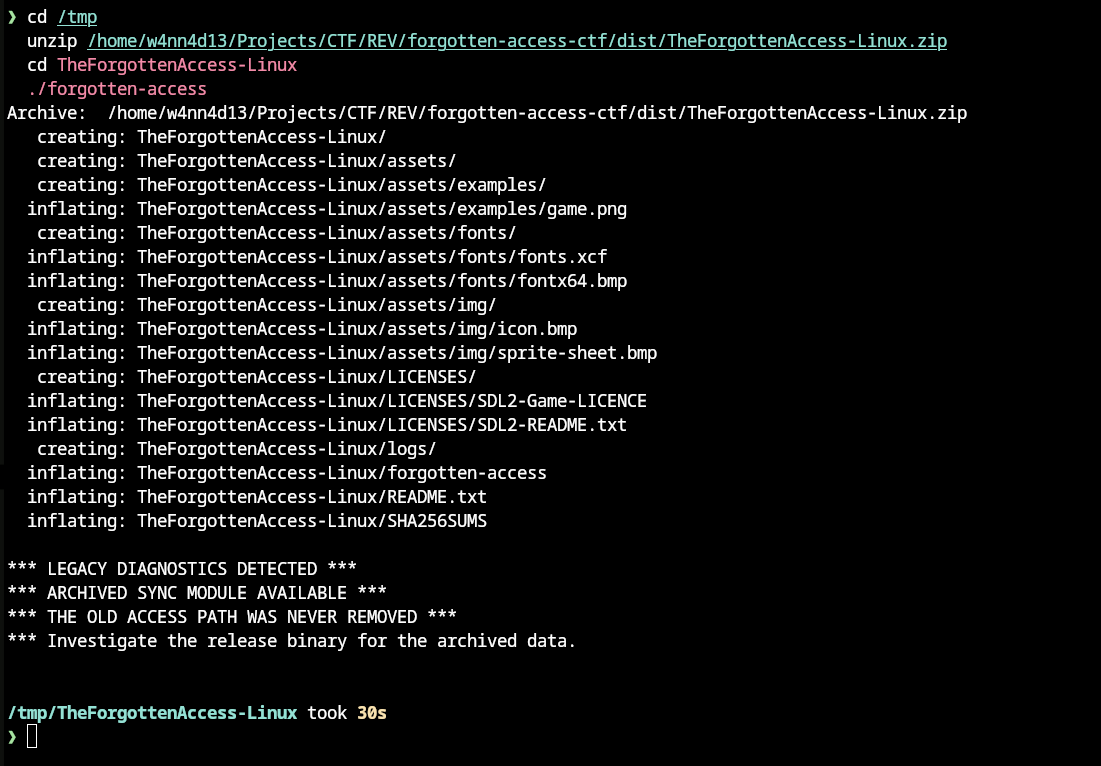
Figure 17 — The terminal diagnostics triggered after reaching score 13. This supplied capture also includes archive extraction from a separate local setup; the player download is the executable itself, so that extraction step is unnecessary.
The diagnostics give us a more explicit instruction:
*** LEGACY DIAGNOSTICS DETECTED ***
*** ARCHIVED SYNC MODULE AVAILABLE ***
*** THE OLD ACCESS PATH WAS NEVER REMOVED ***
*** Investigate the release binary for the archived data.
That changes the task from playing the game to investigating its executable. The message points at an archived path inside the release binary; it does not hand us the implementation or tell us which function decodes it. Please do not submit LEGACY SYNC DETECTED as a flag. The game is giving directions, not accepting attendance.
Initial Reconnaissance: Identify, Fingerprint, Search
Before opening a decompiler, collect the basic facts:
file forgotten-access
sha256sum forgotten-access
strings -a forgotten-access | grep -Ei 'LEGACY|SYNC|DIAGNOSTICS'
file identifies the executable format and platform. Inspection of this artifact’s ELF headers confirms 64-bit, little-endian x86-64, an ET_DYN executable layout, and the interpreter /lib64/ld-linux-x86-64.so.2. There is no .symtab section with the original internal function names, which explains why Ghidra gives us address-based labels such as FUN_001046b6.
sha256sum fingerprints the exact input. The supplied 1,994,848-byte executable has this verified SHA-256:
b0e96e078639cc65bef9538b9ec31f249953ec8991ca9bddd84db0dfa46276fcThat hash matters because the addresses and offsets below belong to this build. Another version can move the tables even if the game still looks identical.
strings finds readable runs of bytes. Among the matches in this binary are:
LEGACY SYNC DETECTED
*** LEGACY DIAGNOSTICS DETECTED ***
*** ARCHIVED SYNC MODULE AVAILABLE ***
Those are useful search anchors, not proof that the payload is stored as plaintext. A string match tells us where to begin following references. It does not replace following them.
Open the ELF in Ghidra
Create a Ghidra project, import forgotten-access, open it in CodeBrowser, and accept auto-analysis. Let Ghidra identify code, functions, strings, and references before trying to reason about a single isolated instruction.
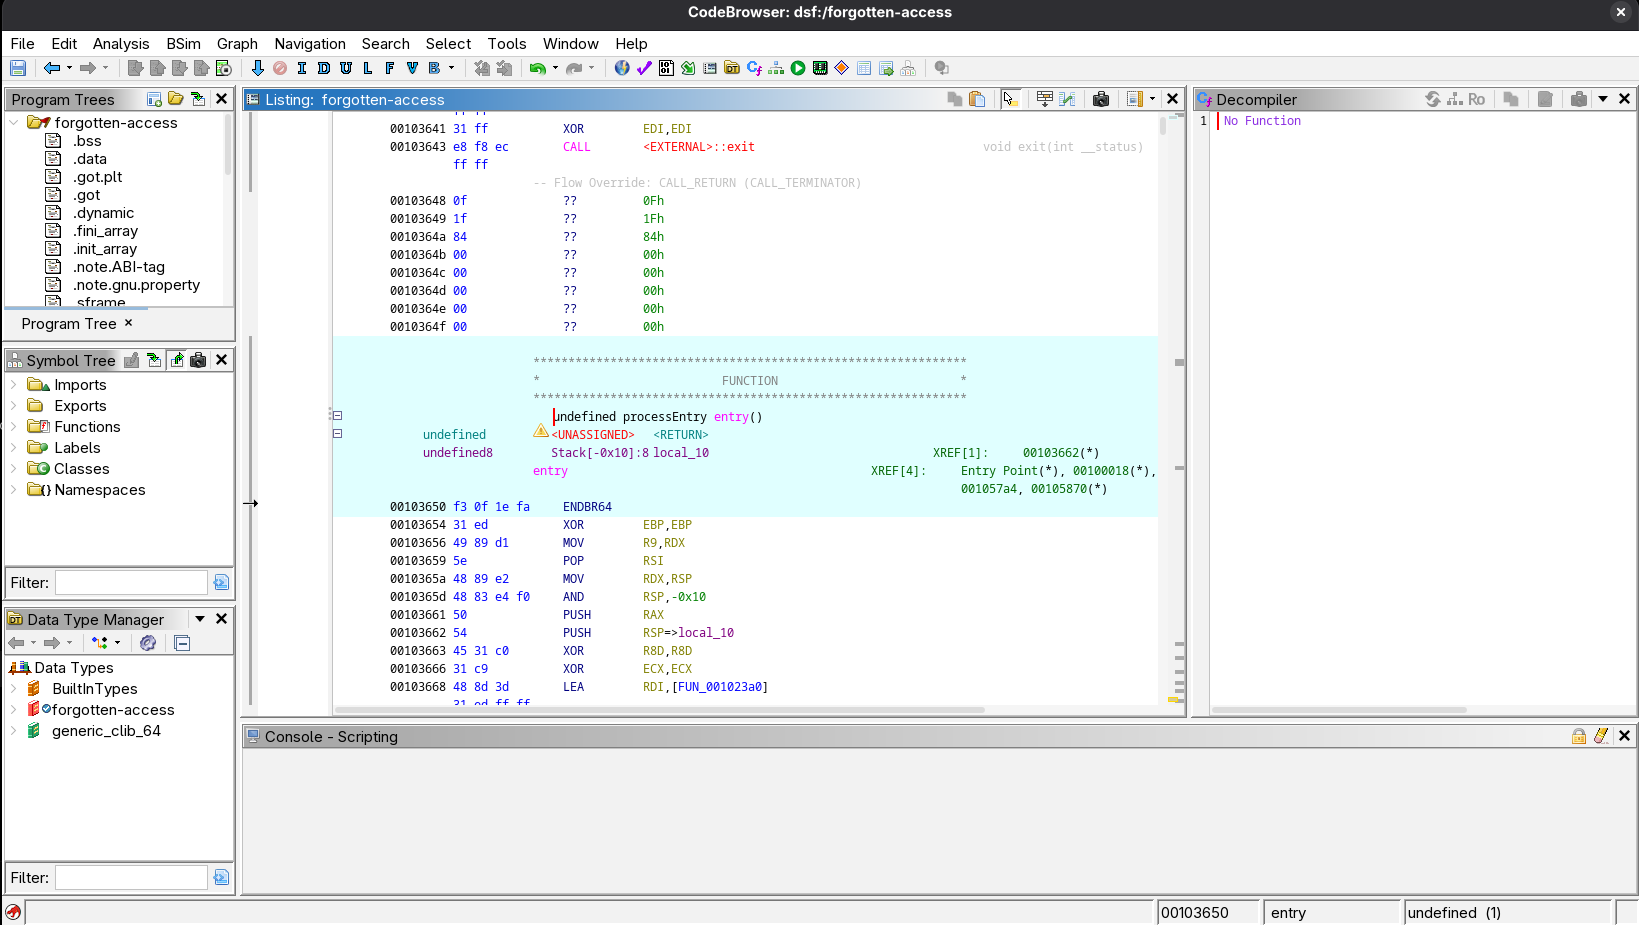
Figure 18 — The imported executable at its entry point. This is the beginning of analysis, not the hidden decoder.
Use Search → For Strings and look for LEGACY, SYNC, and DIAGNOSTICS. The supplied results include the on-screen LEGACY SYNC DETECTED string at 0x001050c2. Nearby strings relate to the game’s score, lives, pause state, and assets, so we are still looking at the game-facing part of the program.
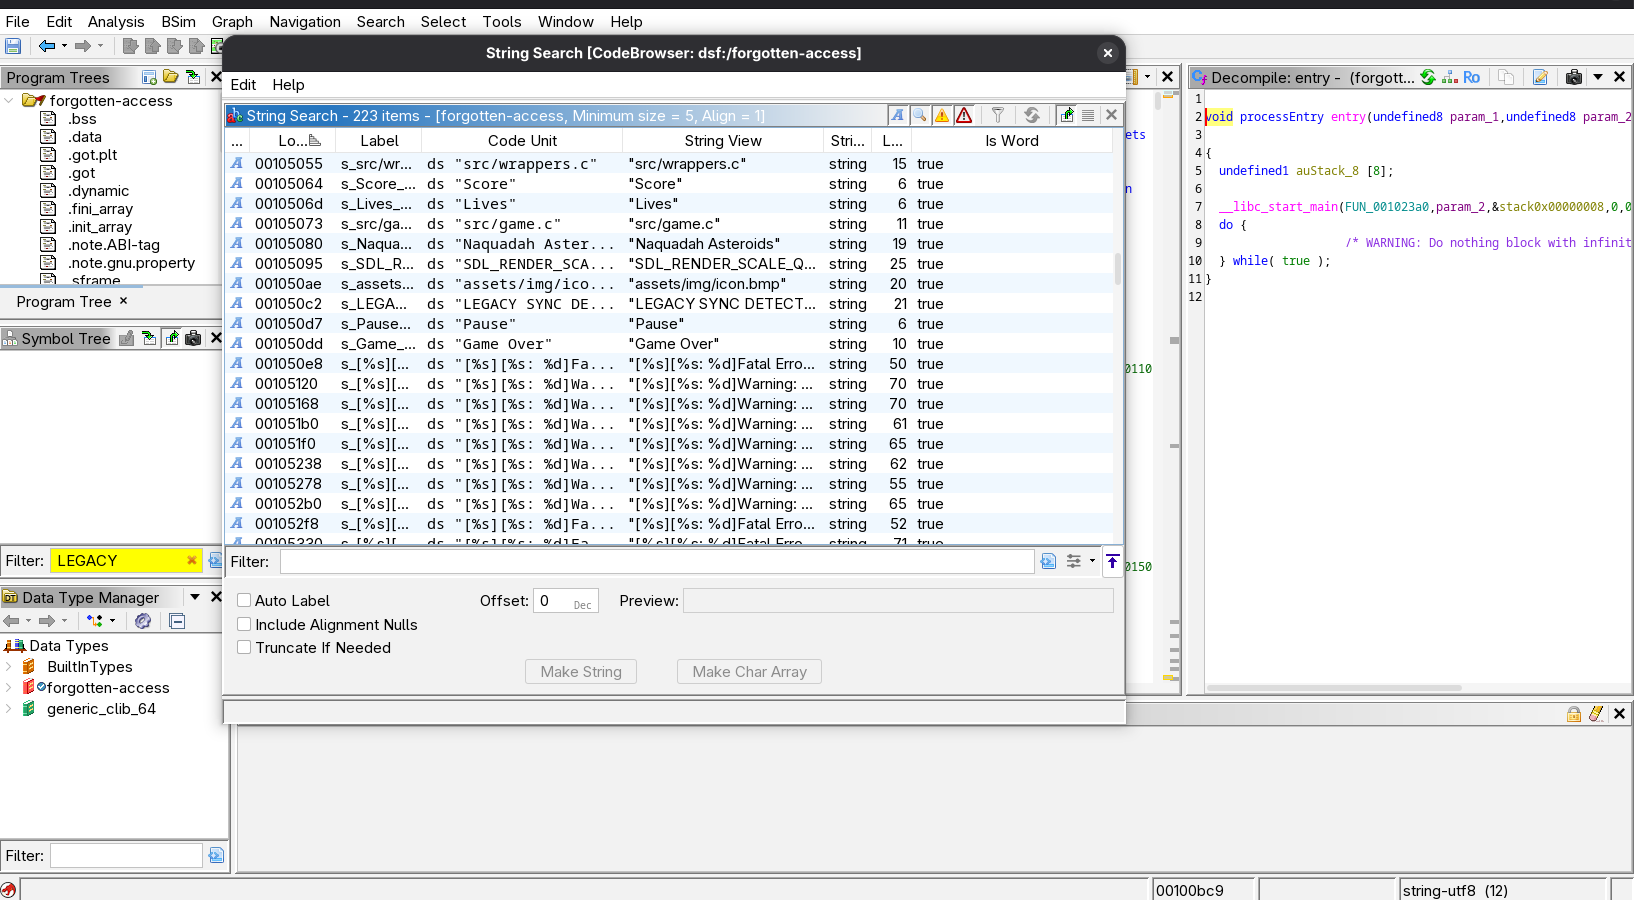
Figure 19 — String search finds the visible clue among normal game strings. A readable message gives us a navigation point.
The longer terminal message *** LEGACY DIAGNOSTICS DETECTED *** is at 0x00105498. Its displayed XREF points into FUN_001023a0, at 0x00102e63. The neighboring archived-sync and old-access-path messages also have references into that function.
An XREF, or cross-reference, is a place that uses an address. Think of finding a sentence in a book, then checking which chapter cites it. Double-click the reference to move from stored text to the code that uses it.
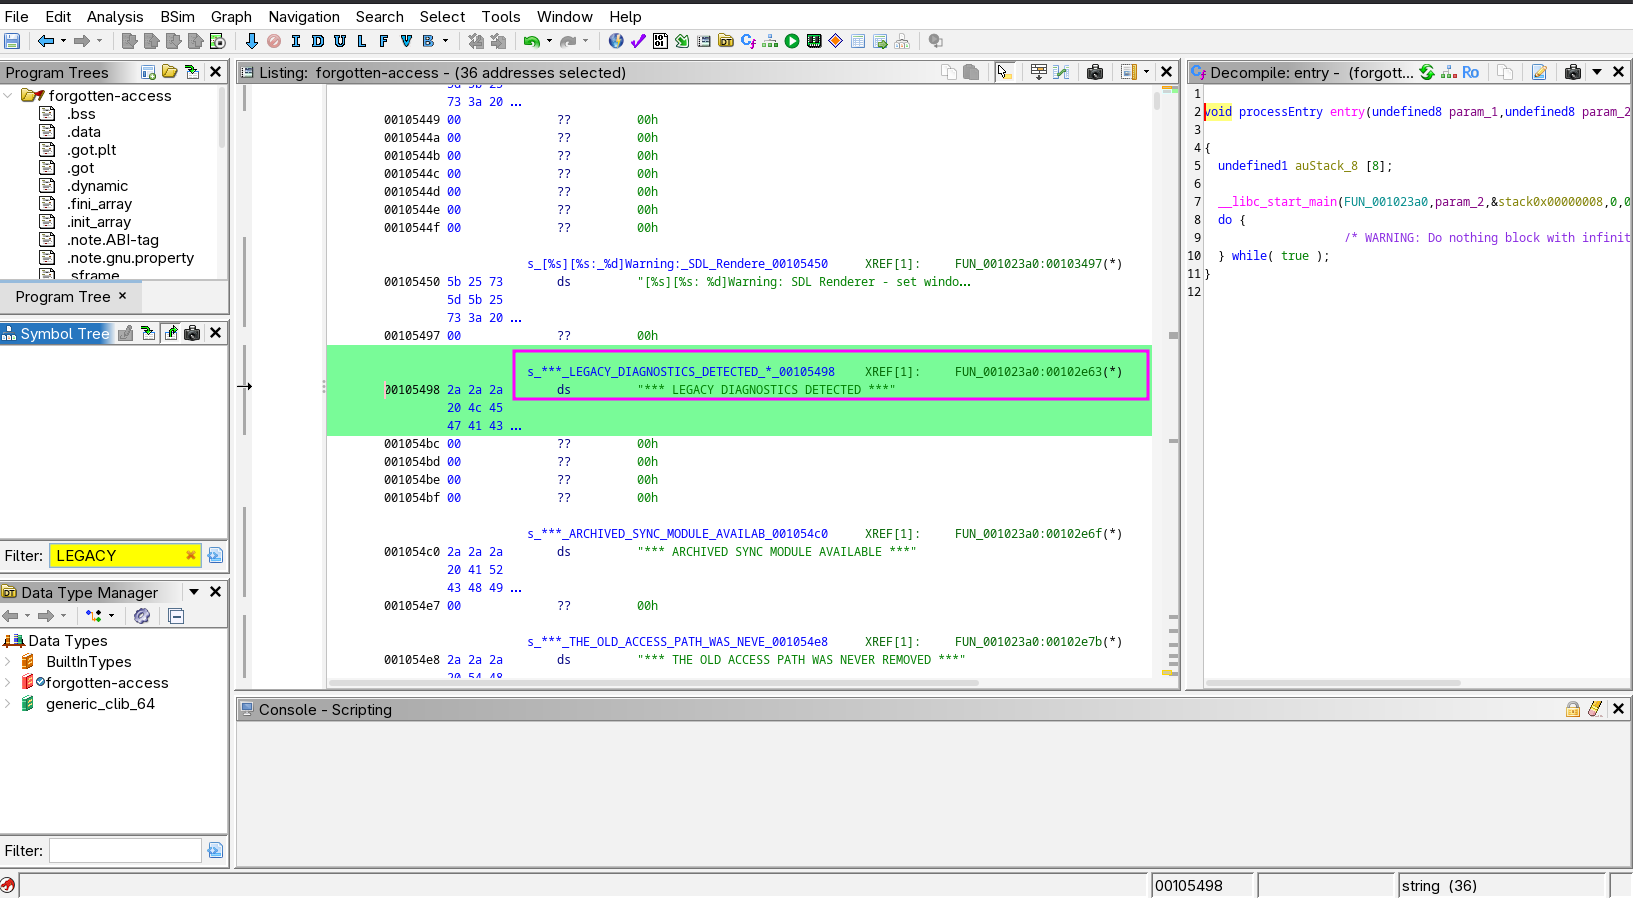
Figure 20 — The diagnostic string at 0x00105498 and its XREF into the game function.
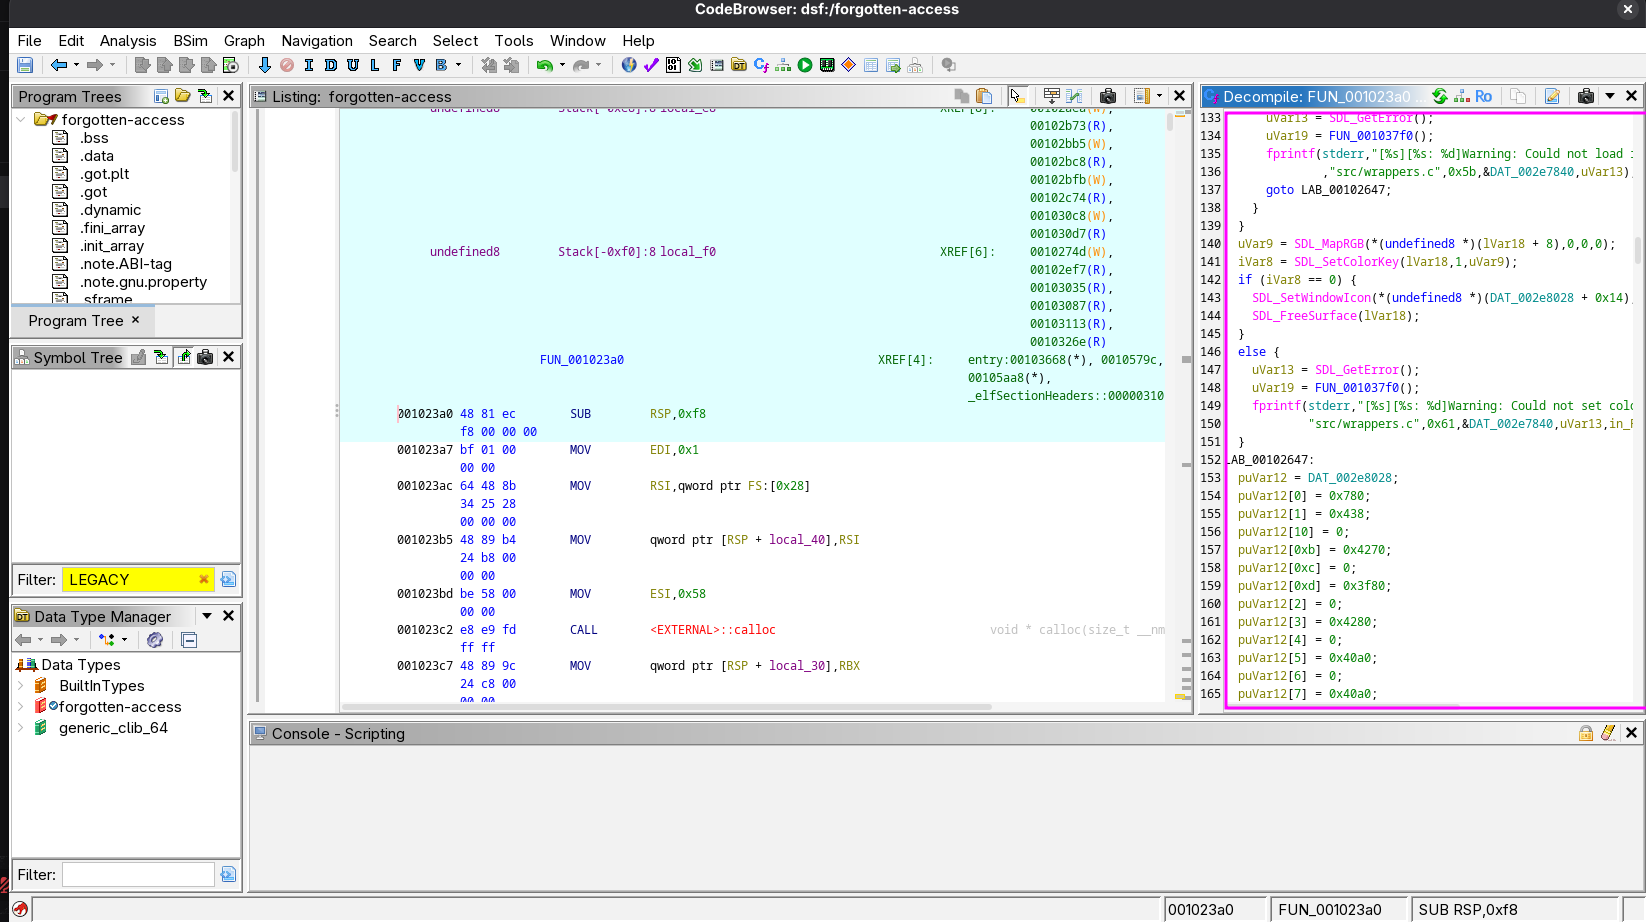
Figure 21 — Following the game-side code leads into FUN_001023a0. The visible SDL initialization helps establish context; it is not the four-layer decoder.
Keep that distinction clear. Finding where the game prints a clue does not establish that the same function recovers the hidden data. We still need code that reads an encoded buffer and transforms its bytes.
Locate the Decoder and Its Helpers
For this build, the relevant routine is FUN_001046b6. In Ghidra, press G and enter 001046b6 to inspect it. The supplied screenshot shows this navigation and the start of the routine’s listing.
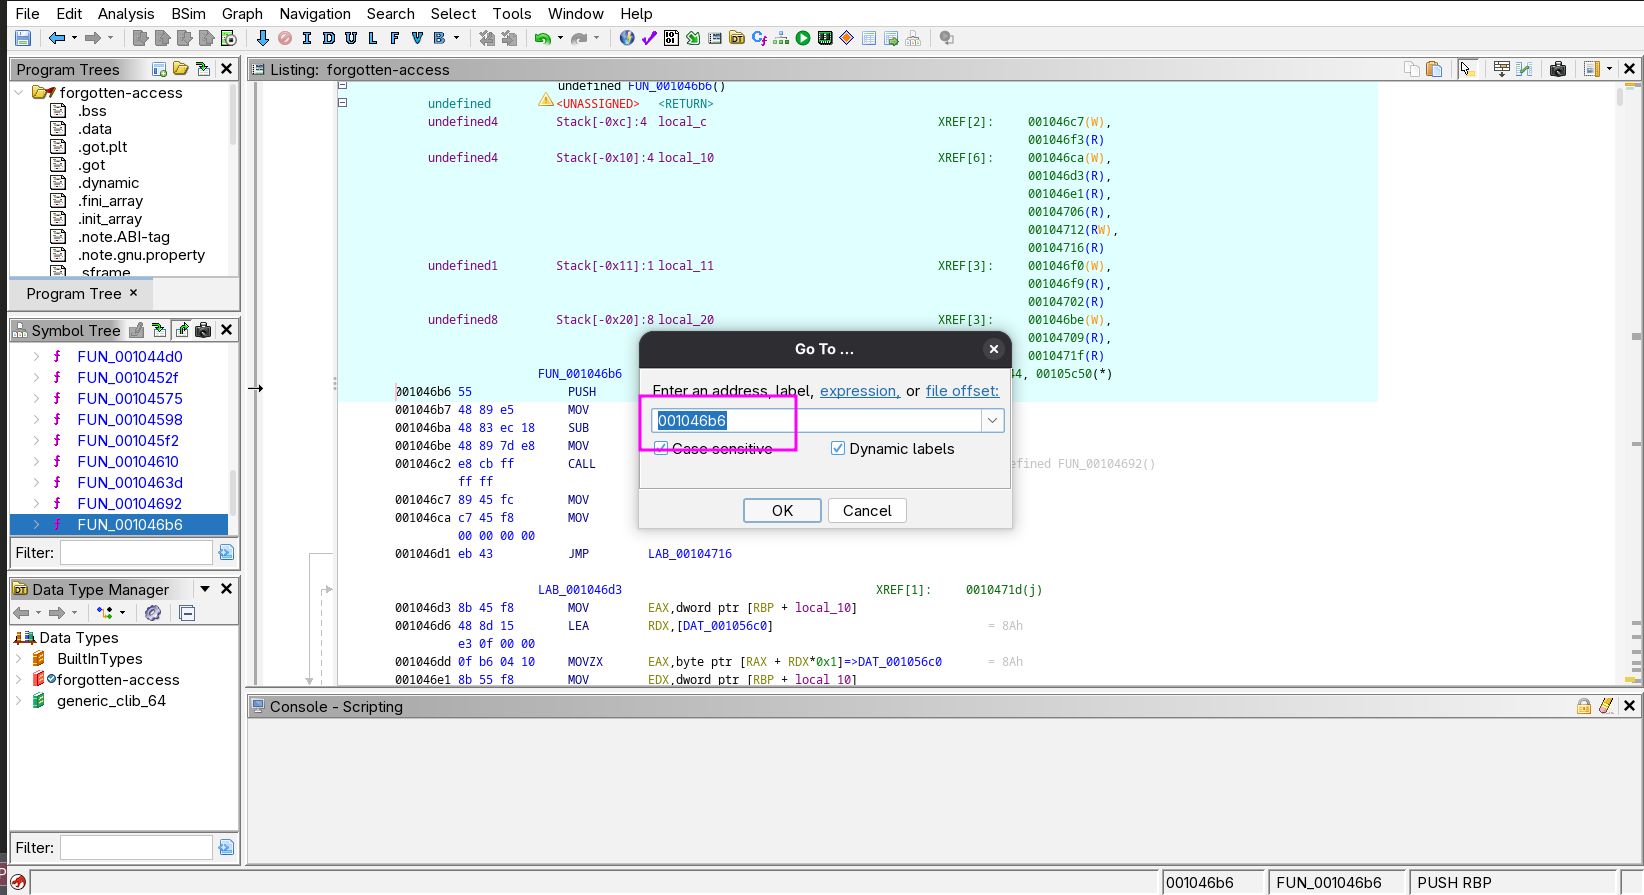
Figure 22 — Navigating to FUN_001046b6, the routine that reads the encrypted blob and writes decoded output.
Static disassembly of the supplied ELF confirms the important behavior: it calls FUN_00104692, loops over the blob at 0x001056c0, calls FUN_0010463d for each byte, optionally applies XOR 0x55, and stores the result in the caller’s output buffer.
The loop compares its zero-based index with 0xc5, inclusive. That is 197, so indices 0 through 197 process 198 bytes. Small off-by-one mistakes are very committed to ruining an otherwise correct decoder.
A readable reconstruction of the relevant loop is:
vm = check_hypervisor();
for (unsigned int i = 0; i < 198; ++i) {
    unsigned char value = decode_byte(encrypted_blob[i], i);
    output[i] = vm ? (value ^ 0x55) : value;
}
Those descriptive names are analysis labels. The stripped binary and screenshots use FUN_... names; Ghidra did not magically recover the original source identifiers.
The VM Branch: One Extra XOR
FUN_00104692 executes CPUID with EAX = 1, then shifts the returned ECX right by 31 bits. That isolates the hypervisor-present bit. The convention is documented in Microsoft’s hypervisor feature-discovery reference.
In simplified form:
CPUID leaf 1
return (ECX >> 31) & 1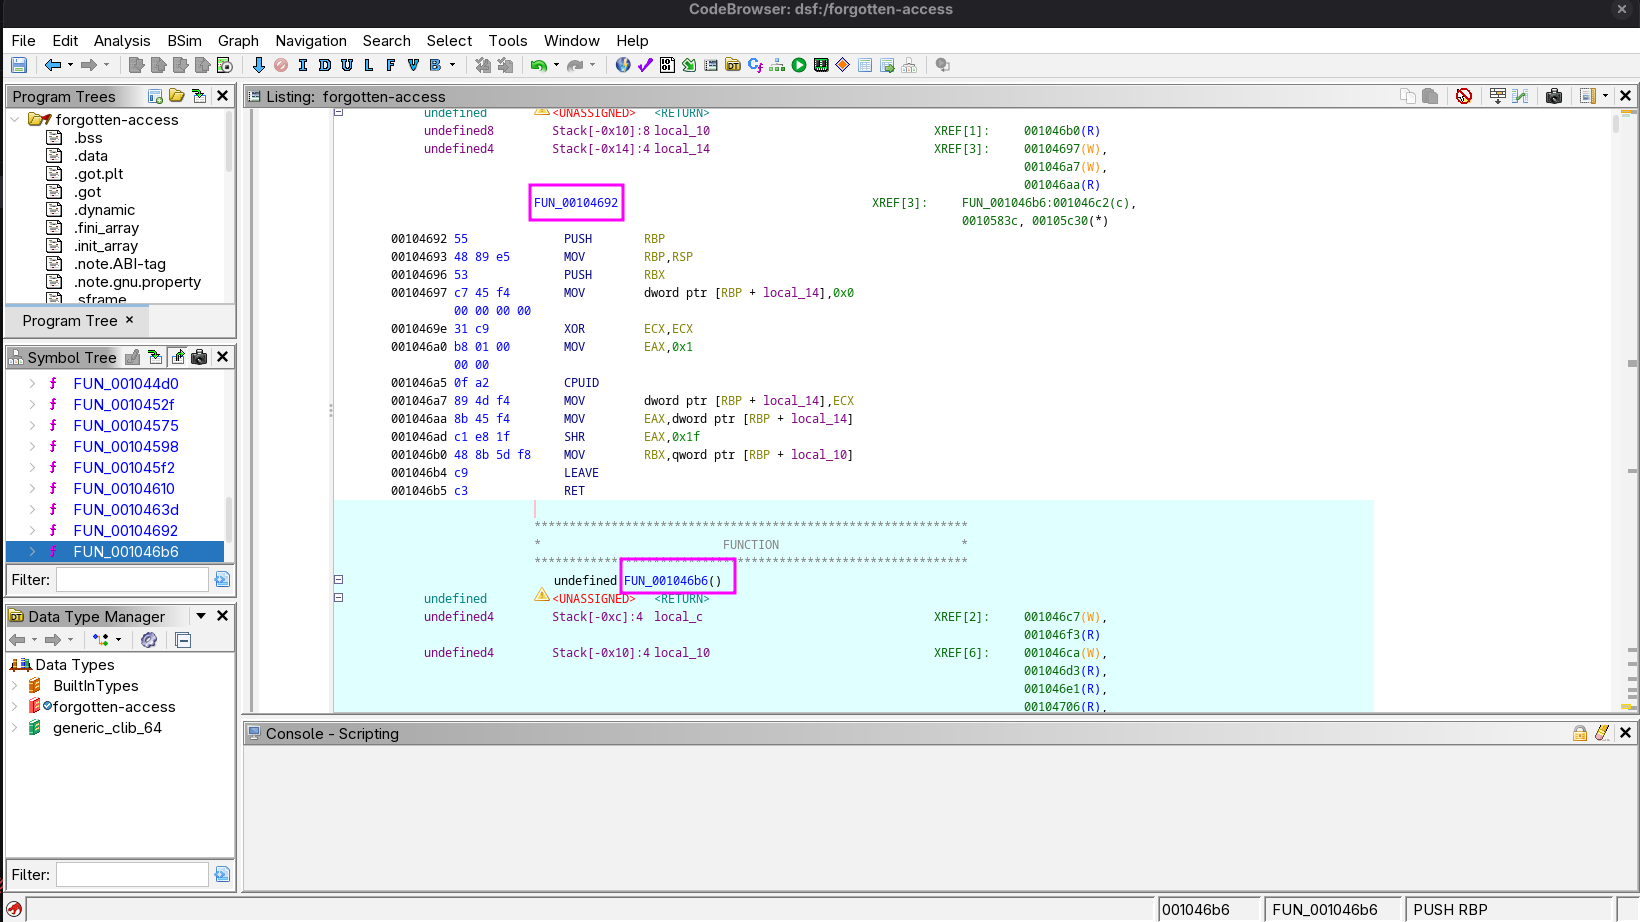
Figure 23 — The VM check at 0x00104692. EAX is set to 1, CPUID runs, and ECX is shifted right by 0x1f.
When that check returns nonzero, the decoder applies value ^ 0x55 after the normal byte transformation. This intentionally corrupts the expected plaintext for that environment. For example, the expected first character f is 0x66; XOR with 0x55 changes it to 0x33, the character 3.
This check is a signal about the reported execution environment, not an infallible detector of every virtual machine. The important fact for this challenge is the branch behavior we can see in the code.
Static reconstruction avoids the issue: read the tables and encrypted bytes from the ELF, implement the normal transformation in Python, and omit that conditional corruption. We do not execute CPUID, patch the executable, or change the VM settings. The branch can remain exactly where it is. We simply understand what it does.
Follow the Four-Layer Byte Transformation
FUN_0010463d chains four helpers in a fixed order. Its arguments are the current encrypted byte and its zero-based position. The decompilation shows successive calls to FUN_001045f2, FUN_00104598, FUN_00104575, and FUN_00104610.
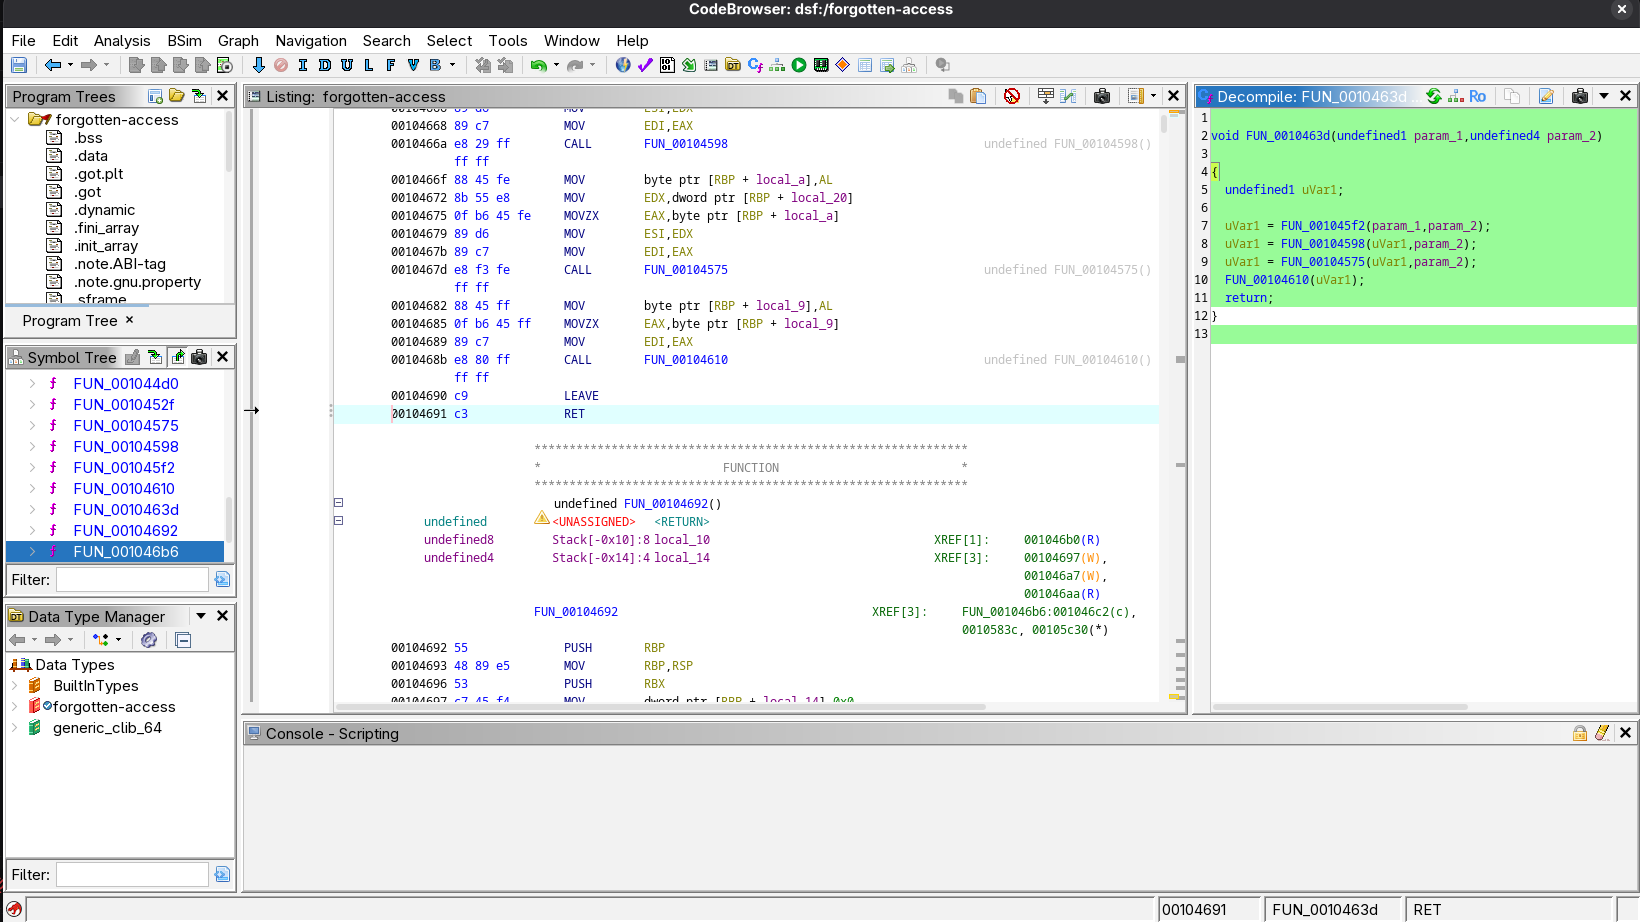
Figure 24 — The actual per-byte chain. Each helper’s result becomes the next helper’s input.
| Function | Operation recovered from the ELF |
|---|---|
FUN_001045f2 | XOR with the position-dependent key from FUN_0010452f |
FUN_00104598 | Rotate right within eight bits by (i % 5) + 1 |
FUN_00104575 | XOR with SBOX[i % 16] |
FUN_00104610 | Swap the high and low nibbles |
This is a custom four-layer byte decoder. It is not RC2. We are reconstructing these operations because the executable performs them, not because several XORs automatically qualify as a named cipher.
1. Remove the Position-Dependent XOR Key
FUN_0010452f calculates:
key = NOISE[(i * 11) % 32] ^ NOISE[(i * 7 + 3) % 32]
value = encrypted_byte ^ key
The two expressions pick positions in the 32-byte NOISE table. The modulo operation wraps an index back into the table: 35 % 32 is 3. XOR combines those two table bytes into the key for this position.
XOR is its own inverse. If plain ^ key produced a masked byte, applying the same key again recovers plain. Here the key changes with the byte index; we cannot use one constant for the entire blob.
At i = 0, the table indices are 0 and 3. Their bytes are 0x71 and 0x4f, so the key is 0x3e. The first encrypted byte is 0x8a:
0x71 XOR 0x4f = 0x3e
0x8a XOR 0x3e = 0xb4
2. Rotate Right Within One Byte
The rotation count is (i % 5) + 1, producing the repeating sequence 1, 2, 3, 4, 5. A rotation preserves bits that would fall off the edge by wrapping them around to the other side.
For example, rotating 00000001 right by one gives 10000000. A plain right shift would give zero instead; that is why replacing a rotate with a shift breaks the result.
value = ((value >> count) | (value << (8 - count))) & 0xffThe mask keeps the result within eight bits. At i = 0, rotate 0xb4 right by one:
10110100  → ROR8 by 1 →  01011010
   0xb4                      0x5a
3. XOR with the Lookup Table
The next helper applies:
value ^= SBOX[i % 16]Despite the SBOX label in the reference notes, this operation does not substitute a byte by using that byte as an index. It looks up a mask using the position, then XORs it with the current byte. The actual indexing expression matters more than the table’s nickname.
At position zero, SBOX[0] is 0x3c:
0x5a XOR 0x3c = 0x664. Swap the Nibbles
A nibble is four bits: half a byte. Swapping the two nibbles changes 0xab into 0xba. In binary, 1010 1011 becomes 1011 1010.
value = ((value & 0x0f) << 4) | (value >> 4)For the first byte, 0x66 stays 0x66, which is ASCII f. Putting the actual first-byte calculation together:
encrypted  → key XOR → ROR8(1) → table XOR → nibble swap → ASCII
   8a          b4        5a          66           66          f
One sensible character is encouraging; decoding all 198 bytes is the real check. The order is essential. Rotating before the first XOR would rotate different bits and produce a different result.
Extract the Tables and Encrypted Blob from .rodata
The helpers reference three byte arrays in .rodata, the executable’s read-only data section:
| Ghidra address | Data | Exact length | File offset in this ELF |
|---|---|---|---|
0x00105650 | SBOX masks | 16 bytes | 0x5650 |
0x00105680 | NOISE table | 32 bytes | 0x5680 |
0x001056c0 | Encrypted blob | 198 bytes | 0x56c0 |
In Ghidra, use G to jump to each address, then inspect or define the corresponding byte array. Do not copy until the next visible string and call that the length. The code’s table indexing and loop bound establish the lengths.
The exact tables read from this binary are:
SBOX (16 bytes):
3c 7a b1 2f 94 e8 5d 06 c3 4e 87 1b f2 69 a0 d5

NOISE (32 bytes):
71 23 c8 4f 96 e1 3a b7 52 0d f4 68 ab 1c 87 3e
d9 65 2b 90 47 fc 18 73 e4 a2 5c 0f b8 34 69 c1
The 198-byte encrypted blob, shown as continuous hex across lines, is:
8a6e40520e542cf3e02283db68a36547b41935146994edfa2a819b16ec01855d
c60d8db576156757caf22af9dd037378ba6c5d87b847d4886cd184d9136f9621
d3e4e3261a24695a6d06bce16205d334b7770ea4dcd8e68e62be4289fde46c83
43fe054a8fa68f5dff3d0c91fb107011b4c45dcf195af9a83bdb6efeccd2c676
9bb9f8f655f21771a8c4c4762c3ea0740c010756f97a82f4956df96d6395633a
41ad6901925eedd9e72409cf6af9616db5b36314e342ecfa246bd895bb09cfde
6d0d873536b0
Ghidra addresses and file offsets are different concepts. For this import, the displayed image base adds 0x00100000 to the ELF’s section addresses. The .rodata section has ELF address 0x5000 and file offset 0x5000; that is why 0x00105650 maps to file offset 0x5650 here. Do not assume this relationship holds for every ELF. The solver below reads the section header and calculates the location explicitly.
Reconstruct the Decoder in Python
We now have enough evidence to reproduce the result without running the game. This reconstruction follows the verified ELF instructions and the four operations recorded in the KB reference summary. The separate detailed reference writeup was not available for comparison, so this is not presented as a verbatim copy of its script.
The only extra package used by this version is pyelftools, which reads ELF metadata:
python -m pip install pyelftoolsSave the following code as a solver in your analysis workspace and pass it the executable path. It opens the binary read-only, verifies its fingerprint, locates .rodata, and extracts exactly the three ranges above. The decoding loop removes the key mask, rotates, removes the position mask, and swaps nibbles. It deliberately does not apply the VM-only XOR 0x55.
import hashlib
import sys
from pathlib import Path

from elftools.elf.elffile import ELFFile

EXPECTED_SHA256 = (
    "b0e96e078639cc65bef9538b9ec31f249"
    "953ec8991ca9bddd84db0dfa46276fc"
)
GHIDRA_IMAGE_BASE = 0x00100000


def ror8(value, count):
    """Rotate a byte right, wrapping the outgoing bits around."""
    return ((value >> count) | (value << (8 - count))) & 0xff


def main():
    if len(sys.argv) != 2:
        raise SystemExit("Usage: python decode_elf.py /path/to/forgotten-access")

    path = Path(sys.argv[1])
    actual_hash = hashlib.sha256(path.read_bytes()).hexdigest()
    if actual_hash != EXPECTED_SHA256:
        raise ValueError("Different ELF build: recheck addresses before decoding")

    with path.open("rb") as stream:
        elf = ELFFile(stream)
        rodata = elf.get_section_by_name(".rodata")
        if rodata is None:
            raise ValueError("Missing .rodata section")
        section_bytes = rodata.data()

        def read_rodata(ghidra_address, length):
            elf_address = ghidra_address - GHIDRA_IMAGE_BASE
            offset = elf_address - rodata["sh_addr"]
            if offset < 0 or offset + length > len(section_bytes):
                raise ValueError("Requested bytes fall outside .rodata")
            return section_bytes[offset:offset + length]

        sbox = read_rodata(0x00105650, 16)
        noise = read_rodata(0x00105680, 32)
        encrypted = read_rodata(0x001056c0, 198)

    output = bytearray()
    for i, encrypted_byte in enumerate(encrypted):
        # FUN_001045f2, using the key from FUN_0010452f.
        key = noise[(i * 11) % 32] ^ noise[(i * 7 + 3) % 32]
        value = encrypted_byte ^ key

        # FUN_00104598: rotate within eight bits.
        value = ror8(value, (i % 5) + 1)

        # FUN_00104575: position-indexed XOR mask.
        value ^= sbox[i % 16]

        # FUN_00104610: exchange the high and low nibbles.
        value = ((value & 0x0f) << 4) | (value >> 4)
        output.append(value)

    # Reconstruct the normal path, without the VM-only XOR 0x55.
    result = output.decode("ascii")
    if not (result.startswith("flag{") and result.endswith("}")):
        raise ValueError("Unexpected decoded payload format")
    print(f"Decoded bytes: {len(output)}")
    print(result)


if __name__ == "__main__":
    main()
The script does not need to emulate SDL, the game loop, or the rest of the executable. We are reconstructing a small data transformation, not rebuilding an Asteroids engine because a byte hurt our feelings.
For example, on Linux:
python decode_elf.py ./forgotten-accessThe Intermediate Payload
Static reconstruction against the supplied binary recovers exactly:
Decoded bytes: 198
flag{f6176034bf5437c6b08459e35f926ca96ff5193341908905f01e07c02785da1988d1ece12db475ad528df4f548c6cc4f1cf61bd15d080957e3e4e331219f57675411b67a30ca5c06d99c2a9a1ab8c34561e05dc08dd0facb9283b4bd147e6fe8}
This is the recovered intermediate flag-looking payload, not the final WiCySxEx0rcists{} answer. The braces contain 192 hexadecimal characters. Recovering them proves that we have reproduced the binary’s normal decoding path; it does not establish the key, mode, or interpretation for the next cryptographic layer.
Decode the Recovered Hex in CyberChef
The ELF has given us a flag{...} wrapper, but the contents still need decoding. Copy only the 192 hexadecimal characters inside the braces into CyberChef. Leave out Decoded bytes: 198, the flag{ prefix, and the closing }.
Two hex characters represent one byte. For example, 4142 represents the two bytes 0x41 and 0x42; it is not the four text bytes for the characters 4, 1, 4, and 2. Our 192-character input therefore represents 96 bytes. Choosing the correct input format matters before we even touch the cipher.
In the supplied CyberChef capture, the recipe is:
- Add RC2 Decrypt.
- Set Input to Hex.
- Set Output to Raw, so the recovered bytes are displayed as text.
- Paste the hex payload into Input and inspect the result with Auto Bake enabled, or click Bake.
The screenshot shows blank Key and IV fields, with both field formats set to HEX. It does not display a mode or effective-key-length setting. I am documenting the supplied capture here, not claiming that a particular key or mode was recovered from the ELF. The earlier four-layer decoder and this RC2 operation are separate steps.
The output starts with github_pat_, identifying it as a GitHub personal access token. I am leaving the credential out of the article text. This result is shown in the supplied screenshot; the RC2 operation was not independently executed during preparation of this section.
Congratulations, the flag-looking string has turned into an access credential. Apparently, even the flag has another door for us to open.
Stage 3 ends with the recovered credential shown in the capture. The next investigation moves to GitHub; using that credential and examining what it can access belong to the next stage.
Stage 4 — GitHub Forensics: The Final Boss
Congratulations. You survived OSINT, extracted secrets from AI weights, reversed a binary, and dealt with cryptography.
Now your final opponent is… GitHub.
And no, I did not give you a cute little repository with three contributors and a flag.txt. I gave you a repository investigation with hundreds of contributor entries and plenty of opportunities to mistake an interesting name for useful evidence.
You saw torvalds in the contributor list and thought you had uncovered the Linux kernel’s deepest secret? Congratulations. You discovered a username.
Even the legends could not save you from scrolling through pull requests.
Before anyone starts writing an announcement: the displayed contributor list is part of the challenge’s investigation trail, not proof that those people helped create this CTF. Contributor attribution and actual involvement in designing a challenge are different claims. The joke is about following the wrong lead, not about the people whose names appear in the output.
First, Ask the Token Who It Belongs To
The previous stage gave us a GitHub personal access token. That is an access credential, not a repository name or a final flag. Start by checking the authenticated identity.
In the commands below, $TOKEN holds the recovered challenge credential. Its value is deliberately omitted. These requests document the supplied walkthrough; I did not make live authenticated API requests while preparing this section.
curl -sS \
  -H "Authorization: Bearer $TOKEN" \
  https://api.github.com/user \
  | jq '{login, id, type}'
The supplied terminal output is:
{
  "login": "0x5t4l1n",
  "id": 161853795,
  "type": "User"
}
Authorization: Bearer sends the credential in the request header. jq selects three fields from the JSON response so we can see the account name, numerical ID, and account type without drowning in profile metadata.
We have established the identity associated with this token in the recorded session: 0x5t4l1n. We have not established that the credential can read every repository owned by that account. Its permissions still matter.
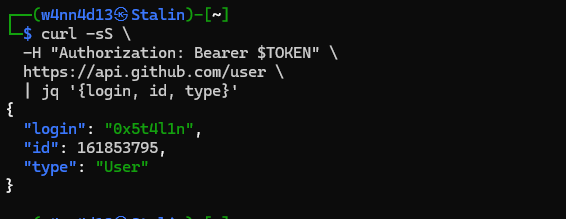
Figure 26 — The authenticated identity is 0x5t4l1n. The request uses the TOKEN variable without displaying its value.
Discover the Repository Instead of Guessing Its Name
At this point in the investigation, we do not need to know the target repository’s name. Ask GitHub which repositories the authenticated credential can see:
curl -sS \
  -H "Authorization: Bearer $TOKEN" \
  "https://api.github.com/user/repos?visibility=all&affiliation=owner,collaborator,organization_member&per_page=100" \
  | jq -r '.[] | "\(.full_name) | Private: \(.private)"'
GET /user/repos lists repositories available to the authenticated user within the token’s access. The query includes public and private visibility and the specified ownership, collaboration, and organization affiliations. It does not bypass permissions. See GitHub’s authenticated repository-listing documentation.
The supplied output contains many public repositories. Among them is this entry:
0x5t4l1n/email-extractor | Private: false
0x5t4l1n/enna_flag_venuma | Private: true
0x5t4l1n/enterprise-rag | Private: false
Now we have a concrete lead: 0x5t4l1n/enna_flag_venuma, reported as private. We discovered it through the accessible-repository listing rather than hard-coding its name into our first request.

Figure 27 — The relevant discovery: enna_flag_venuma with Private: true.
Private: true is metadata about the repository’s visibility. The successful listing shows that this credential could see that entry in the recorded session. It does not mean the repository was public, and it does not tell us the credential’s complete permission set.
Set the repository variable for the remaining commands:
REPO='0x5t4l1n/enna_flag_venuma'The Contributor Rabbit Hole
Next, inspect the contributors:
curl -sS \
  -H "Authorization: Bearer $TOKEN" \
  "https://api.github.com/repos/$REPO/contributors?per_page=100" \
  | jq -r '.[] | "\(.login) — \(.contributions) commits"'
The beginning of the supplied output reads:
github-actions[bot] — 27 commits
0x5t4l1n — 26 commits
torvalds — 19 commits
Copilot — 5 commits
0xflotus — 1 commits
38elements — 1 commits
That is an excerpt, not the complete list. The command prints the API’s contributions field with the literal label commits; the label comes from the jq expression. It is not an audit of what each person did or evidence that they knowingly participated in this challenge.
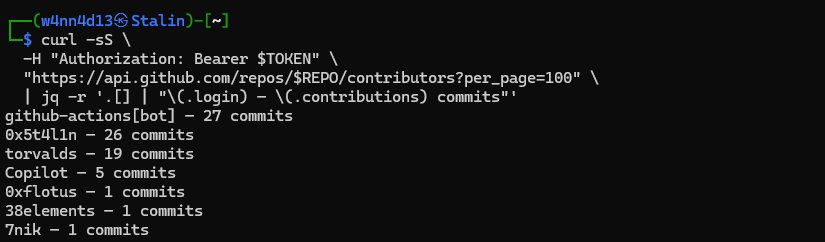
Figure 28 — The contributor trail. Recognizable usernames do not establish involvement in creating this CTF.
Imagine finding the name of the Linux creator in a CTF repository and thinking you have found the answer. Bro, there is still no flag in that username. Opening the profile in a seventh tab does not add one.
The useful question is whether a contributor entry connects to a relevant change. Names are leads we can evaluate. A familiar name alone tells us nothing about where the secret was added.
One Hundred Results Is One Page
The per_page=100 parameter requests up to 100 entries per page, not all available entries. That applies to the repository listing as well as the contributors request. A long terminal output can still be incomplete.
To see whether another page exists, inspect the response headers separately:
curl -sS -D - -o /dev/null \
  -H "Authorization: Bearer $TOKEN" \
  "https://api.github.com/repos/$REPO/contributors?per_page=100"
Follow the URL marked rel="next" in the Link header when present. A page can also be requested explicitly:
curl -sS \
  -H "Authorization: Bearer $TOKEN" \
  "https://api.github.com/repos/$REPO/contributors?per_page=100&page=2" \
  | jq -r '.[] | "\(.login) — \(.contributions) commits"'
Repeat as needed rather than treating page one as the whole repository. GitHub explains the Link header and page parameters in its pagination guide.
Pagination is part of collecting evidence. Spending the rest of the evening investigating every username is a separate hobby, and I respect your ability to invent side quests.
Look at Pull Requests, Including the Closed Ones
The repository’s current files are only one view of its activity. Pull requests preserve proposed changes and their review context. A closed request can still contain exactly the material we need to examine, even when browsing the current branch does not reveal it.
List both open and closed requests with state=all:
curl -sS \
  -H "Authorization: Bearer $TOKEN" \
  "https://api.github.com/repos/$REPO/pulls?state=all&per_page=100" \
  | jq -r '.[] | "#\(.number) | \(.state) | \(.title)"'
Use the same pagination discipline if more pages are available. The API’s default listing is open requests; explicitly including all states prevents closed work from disappearing from our investigation. GitHub documents that filter in its pull-request API reference.
The request identified in the supplied walkthrough is PR #6, titled:
Add secret key to EnV.txt
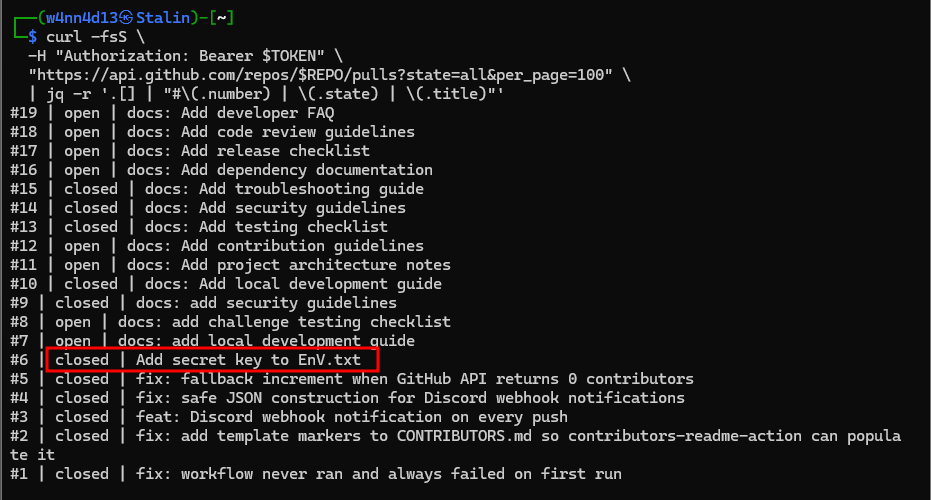
Figure 29 — Listing all PR states reveals closed PR #6 among the surrounding changes.
That title is worth inspecting. We do not have to guess that a celebrity username is an elaborate cipher when a pull request is volunteering the words “secret key.” Sometimes the clue has the subtlety of a smoke alarm.
Inspect PR #6: Metadata, Files, Then Patch
Start with the request metadata:
curl -sS \
  -H "Authorization: Bearer $TOKEN" \
  "https://api.github.com/repos/$REPO/pulls/6" \
  | jq '{number, state, title, head: .head.ref, base: .base.ref}'
The supplied challenge details identify:
| Field | Value |
|---|---|
| PR number | 6 |
| State | closed |
| Title | Add secret key to EnV.txt |
| Source branch | enna_pa_indha_pakkam |
| Target branch | main |
head.ref is the source branch containing the proposed changes; base.ref is the target branch. Closed does not necessarily mean merged. A separate merged field is available in the PR details; the supplied state alone does not establish a merge.
Now list the changed files:
curl -sS \
  -H "Authorization: Bearer $TOKEN" \
  "https://api.github.com/repos/$REPO/pulls/6/files?per_page=100" \
  | jq '.[] | {filename, status, additions, deletions}'
The relevant file is EnV.txt, with status added. Keep the capitalization: EnV.txt is the filename provided for this change. We are inspecting the file list associated with PR #6, not assuming that the file exists on today’s main branch.
Finally, read that file’s patch:
curl -sS \
  -H "Authorization: Bearer $TOKEN" \
  "https://api.github.com/repos/$REPO/pulls/6/files?per_page=100" \
  | jq -r '.[] | select(.filename == "EnV.txt") | .patch'
The file endpoint exposes change information, including the patch when available. The command filters the response to the exact filename and prints its diff rather than dumping unrelated metadata. See the changed-files endpoint for the response fields.
In a unified diff, a content line beginning with + was added; a line beginning with - was removed. For example, +hello means the change adds the text hello, not that the file contains a literal plus sign before it. The +++ filename header has a different role, so do not strip every plus sign indiscriminately and call that parsing.
The Flag Was in the Historical Diff
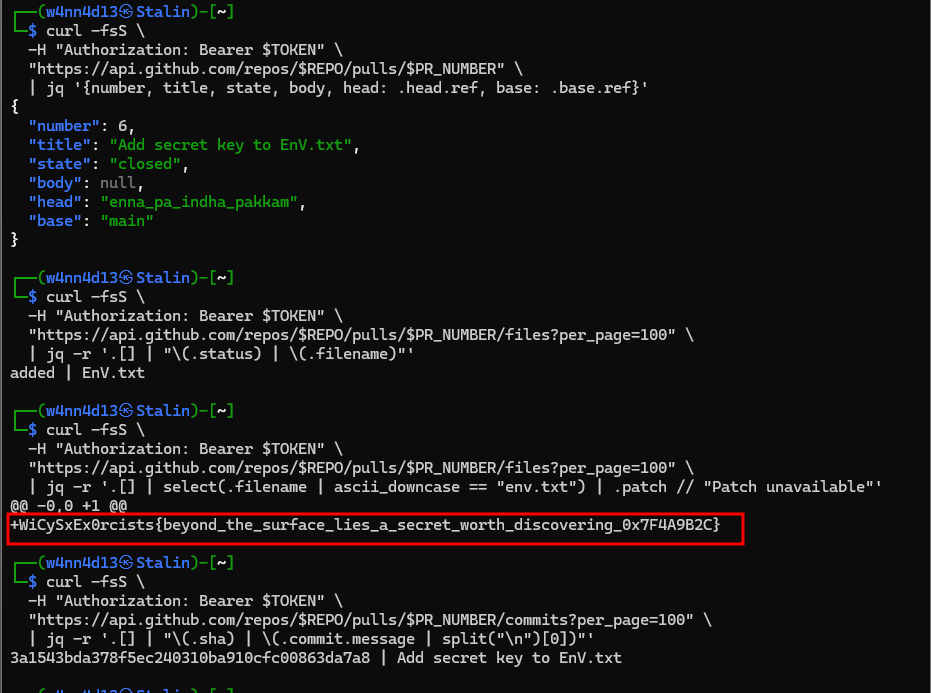
Figure 30 — The evidence together: source branch enna_pa_indha_pakkam, target main, added file EnV.txt, and the flag-bearing patch.
The relevant added line, using the exact flag supplied for this challenge, is:
+WiCySxEx0rcists{beyond_the_surface_lies_a_secret_worth_discovering_0x7F4A9B2C}Remove the diff’s addition marker. The recovered final flag is:
WiCySxEx0rcists{beyond_the_surface_lies_a_secret_worth_discovering_0x7F4A9B2C}This time the prefix matches the challenge’s flag format. We reached it through a specific evidence chain: authenticated identity, accessible private repository, pull-request listing, PR #6, and the added line in EnV.txt.
The important artifact is the historical file diff. Closing a pull request does not make its proposed changes irrelevant to an investigator. Looking only at open requests or the latest tree would skip the place where this challenge left the answer.
And one last thing: don’t even think about trying to hack my GitHub account with the challenge token. The challenge ends at the flag, guys—not in my account settings. Nice try, though. Happy hacking! 🏴☠️